Black Bear using LRC

If you would like to post, you'll need to register. Note that if you have a BCG store account, you'll need a new, separate account here (we keep the two sites separate for security purposes).

BCcanuck

Well-known member
Supporting Member
Marketplace
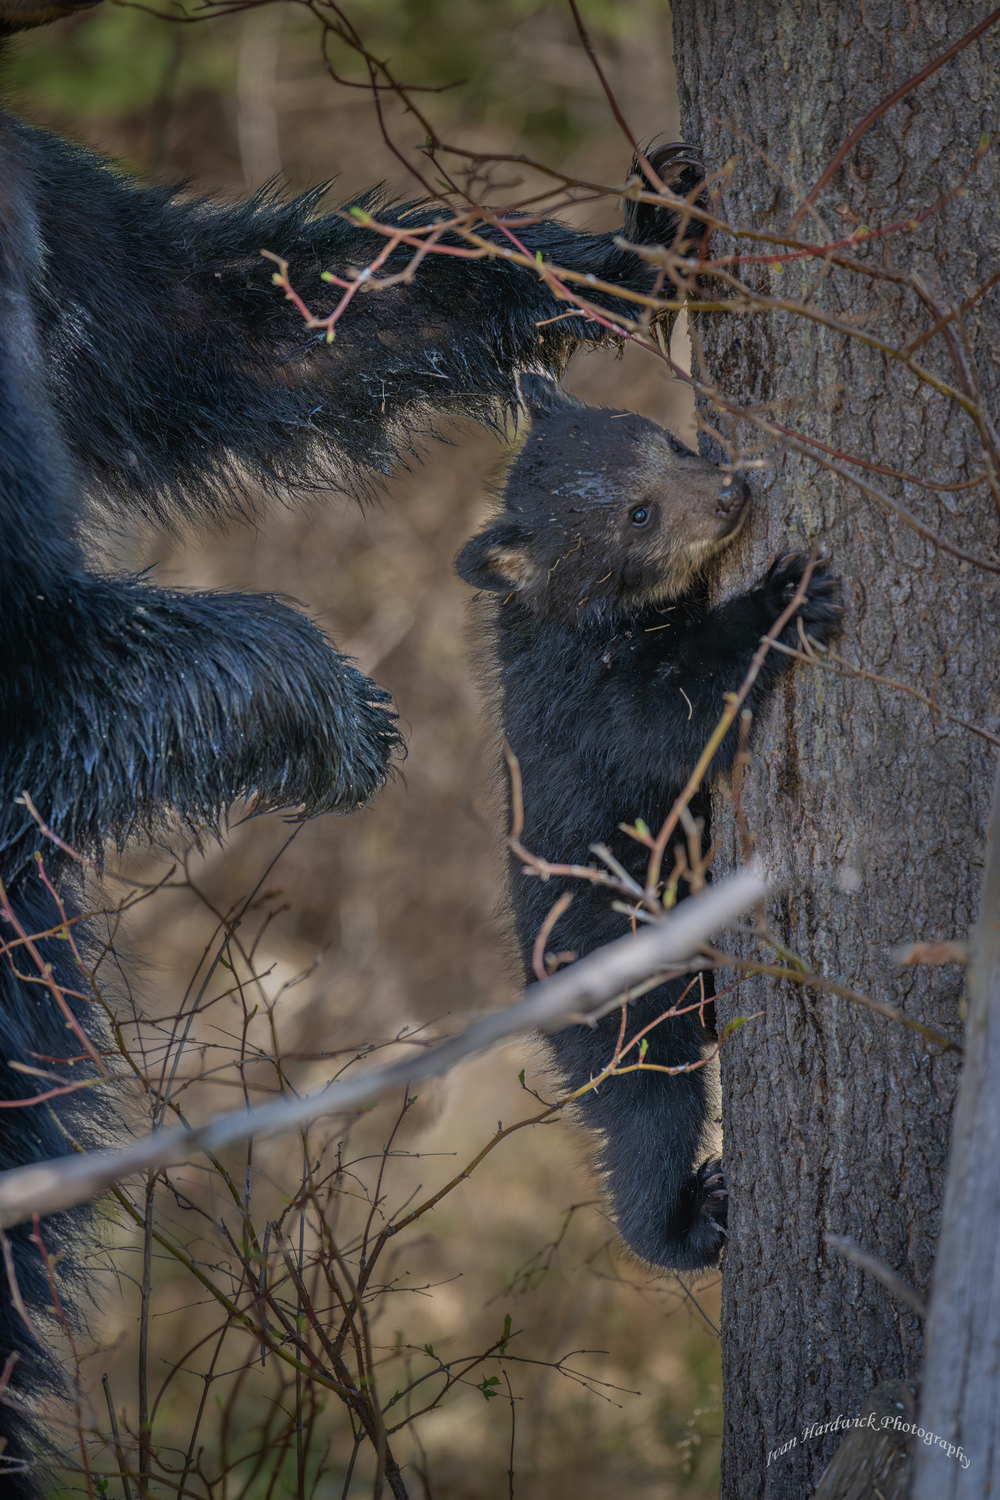
This is my first serious attempt using Lightroom Classic. I'm not totally happy with the end product but I'm not sure just what I can expect to achieve. Would you guys like to critique, make suggestions and comment? The image has not been cropped.
BBC4.jpg
You can only see EXIF info for this image if you are logged in.
 
The image looks a bit underexposed. Try increasing the exposure a little, then set the black and white points. To set the black and white points, hold down the Alt key(if using a PC) while sliding the black slider until you get indication of just a bit of black. Then hold down the Alt Key while sliding the white slider until you see just a teeny indication of white. See if that helps.
 
You don't say what sliders were used, which would have been helpful. Since I was trained on PS, I generally set the black and white points first, take up shadows and down highlights and only then do I brighten the image using the exposure slider. In LrC, desktop, it often works (but not always) to simply hit Auto, then I most often reset the saturation and vibrance slider as too much is often added. After the Auto setting does its magic, I then do what I want with the image, changing some settings and adding other slider settings. Starting with the best image possible makes the job easier. On this particular image the whitish branch in the front would prevent me from using it, or I would need to do deleting in PS in order to use it.
 
I'm not sure what sliders and in what order I did use them DUH!!

Holding down the Alt key really helps, thank;s for that tip.

I was not able to get in a position that precluded having the offending branch front and centre, the bear was only 15 feet from me and I was distracted praying that the cub would not get curious about me and wander my way.

If possible, can you explain ( or point me to a source) how to remove that branch. I have PS but have very lttle understanding of how to operate it.
 
The thing that jumps out at me is the halo around the both bear's fur (and between the cub's leg and the tree). It seems obvious this bright part was the brightness of the background and you darkened the background while trying to keep the bears (and tree) light. With the jagged texture of their fur it's a difficult trick to pull off. What I do (I use Photoshop Elements not Lightroom) is use a semi large brush and just go ahead and darken the whole outline. In my experience it is more pleasing and much less obvious if you let that border area of jagged fur go dark in order to make the background the same exposure all the way into the body.
 
You don't say what sliders were used, which would have been helpful. Since I was trained on PS, I generally set the black and white points first, take up shadows and down highlights and only then do I brighten the image using the exposure slider. In LrC, desktop, it often works (but not always) to simply hit Auto, then I most often reset the saturation and vibrance slider as too much is often added. After the Auto setting does its magic, I then do what I want with the image, changing some settings and adding other slider settings. Starting with the best image possible makes the job easier. On this particular image the whitish branch in the front would prevent me from using it, or I would need to do deleting in PS in order to use it.

I can understand why you want the shot to work, babies are always cute and are one of the subjects I love best. One thing you can do for this particular shot is to use a square format, this will cut out a lot of the less desirable subjects, then using the Transform Panel and Scale tool in LrC you can enlarge the subject to fill the format which might take out a lot of that branch. You can try correcting any other light-colored branches using the spotting/eraser tool in LrC, note that you can go over a correction in LrC if you hit the H key, that makes all the outlines go away and allows you to correct over a correction. Just be sure to hit it again, it's a toggle, when you are done or you might forget and the next time you use the tool you'll go "what happened to the eraser tool, it's gone." Try that first.
Screenshot 2023-05-07 at 5.24.20 PM.png
 
Last edited:
Forgetting about processing for the moment, it is a charming photo - the cub learning how to climb, protected by the arms of its parent (presumably the mother). The white branch is a pity, but going close and moving it out of the way was obviously not an option.
 
Yeah, this can be edited to be a better photo, but is a super image as is. May never have another chance to make another. I'd be very concerned that Mom would attack! Congrats
 
This is a photo that fits the remove tool well

I used the remove tool in PS Beta - and cleaned it up - 2 min job - and also did a squire crop. For me it is a huge improvement. I can post it here if you like. But of course you don't have to like it - it's your photo after all
 
Wonderful photo! Nice work! I was fearing for your life when I saw 400mm lens with that much bear in frame and so much detail, but obviously you're still alive!
 
Last edited:
Removing that branch is not an easy job, even for experienced photoshoppers. The problem is getting the pattern and texture of the animal fur and the tree bark to look realistic behind what is removed. I would end up using multiple tools. The patch tool for sure, and supplemented with the healing tool in normal, and in some areas in replace mode, also the clone tool on some parts. The value of the patch tool in content aware mode is you can see how the patch will align with the existing before releasing. After releasing you can repeat if needed. Also the color and texture sliders let you find tune the result. One cool trick is to use crtl H to toggle hiding the marching ants while keeping the selection. This gives a better view of the results while using the patch tool. Ctrl h again to show the marching ants, or ctrl D to unselect.

Maybe try some easier removals first.
 
Last edited:
Back
Top