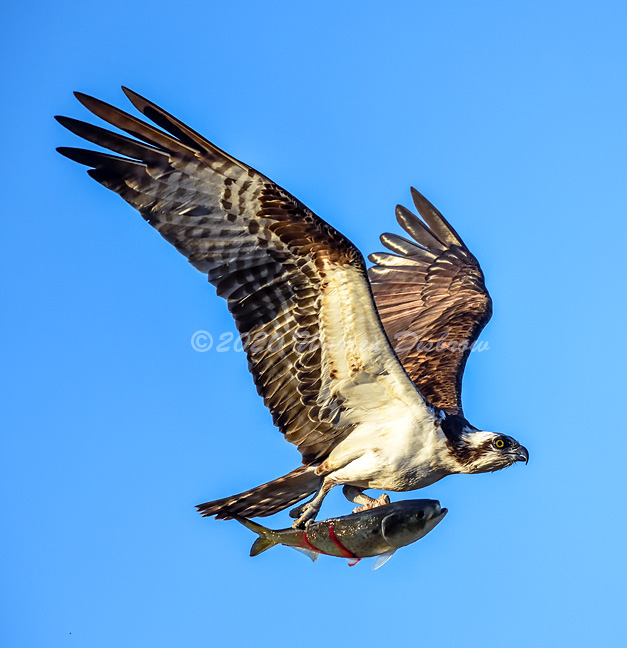
Blown skies in BIF.

If you would like to post, you'll need to register. Note that if you have a BCG store account, you'll need a new, separate account here (we keep the two sites separate for security purposes).

In most cases when I am photographing BIF I end up with a blown sky.
In South Africa, our skies are so bright they are often washed out to start with.

I shoot using Manual with auto ISO on my Nikon D500 using a Nikon 200--500mm zoom.

Depending on the position of the sun, I normally have to allow 2 to 4 stops of exposure compensation to get the correct exposure on the subject.
The sky is totally blown. Trying to rescue it by using the ACR corrections is not effective, even if the corrections are applied selectively to the sky, there are just no pixels to process!.

To rescue the image I have now resorted to taking a separate image, exposed for the sky.

I then have to replace the sky in the image exposed for the bird with the image exposed for the sky.
This increases the processing time and normally results in image halo problems, particularly if the bird is a raptor and dark.

Is there any technique that can overcome this problem?

I am using Photoshop Elements 2018 with Elements+ to process.
 
Welcome to the world of BIF! You could try to underexpose the bird slightly and then bring up the shadows. I'm not familiar with Elements so I don't know if/how to do that with that software. I've had decent luck over the years with Nikon's D-lighting when applied in raw processing through Capture. The only other way that works for me is to shoot early and late in the day when the sun is not overhead. The lower light angle puts more light on the underside of the bird as opposed to a sun that is overhead.
A low sun angle (6am local) and there is good light on the underside:
170697457.jpg
 
It’s tough. I use yellow billed kites to practice on and figure things out so that’s fairly much what you’re on about. You’ve probably already figured out most of what I can offer but I’ll say anyway.
1st choice – shoot either end of the day and wait until the bird is in a position where the light is shining on the bird nicely. On the equator that’s really before 9.30 and after 5.00.
2nd choice – get above the bird, so at least you’ve got the sun angle a bit more under control. Quite limited in the places this works.
3rd choice – wait for the bird to be low so you don’t have the sky involved. This is about understanding your bird and getting yourself set up. For raptors it’s often the same as the first choice. It’s a game of patience.
My philosophy is shoot when it’s right and just enjoy being out when the conditions are too harsh.
 
I gather from your post you're shooting NEF and not Jpeg. You have more latitude in a RAW file to pull back overexposed highlights and also to pull up underexposed shadow areas.
I also second the idea of underexposing the bird a bit to salvage the highlights, then lighten the shadows in post. I'm not aware of any other effective way to deal with this other than replacing the sky afterwards.
 
Last edited:
If Elements supports layer masks you can bring the sky down in a new layer then mask it and paint the mask out from the subject. Shooting RAW will usually give some sky detail as it will not burn out at the same level as a jpg.

Steve has some editing tips here and I can also recommend Colin Smith of Photoshop Cafe for easy to follow editing techniques. Your halos are almost certainly down to poor editing technique as there are several ways to do what you are doing with no halos when you know the things you need to do. I don't know these without looking for them but I know they are there!
 
Last edited:
Try using highlight metering (the option with the asterisk after matrix) and bring down the exposure compensation until you get rid of the blinkies. There is no reason in the world you should have to resort to masks and layers to get the proper compensation.
500_2503-Edit.60jpg.jpg
You can only see EXIF info for this image if you are logged in.
 
Hi, I’ve been thinking about this problem and if you’ve got the patience then you could try to work out the dynamic range of the scene you’re commonly having problems. It helps to have a common bird close to hand so you can hammer away until you get what you’re after.

For a dark raptor on a bright day set everything to manual, iso 100 and wide open (5.6 I think). Then work the speed to get the perfectly exposed bird. You’re not worried about a sharp pic, only exposure. Then take a pic perfectly exposed for the sky using the same settings except using the speed to expose. See the number of stops it takes to go from bird to sky.

Then go to https://www.photonstophotos.net/ and check the dynamic range of your sensor over the various levels of iso. At 100 iso you’re looking at 10.66 stops so if you’re scene range is above this (and I suspect it is) you need to accept you can’t capture the range. If you need to increase iso because you need speed you’re problem gets greater as your dynamic range reduces.

If you’re within sensor range I’d suggest switching to full manual and with experience pick the sweet spot between where the detail both sides is retained. One problem is that the bird is the subject so you need to avoid noise there.
 
In most cases when I am photographing BIF I end up with a blown sky.
In South Africa, our skies are so bright they are often washed out to start with.

I have been setting the highlights optimal exposure - b7 in the D850 menu, will vary in other models - to minus 1/6 in matrix mode in the last 3 cameras I've had. It only takes a couple of seconds to do so you could play about and set it differently for the conditions you face.
 
If you have time between shots before the birds flies away - Since you are a raw shooter try increasing exposure until you find the point where first blinkie appears in the brightest part of the scene that you care about. Back off to find the highest non blinking exposure and, depending on your camera, add 2/3 or so stops to that. This will place your brightest highlight as high as it will go without clipping, with plenty of latitude to drag the bird back in lightroom or ACR.
 
Wow!!!

I apologize for the delay in replying, I have been out of internet range.
I wish I had seen the replies above before I left.
Luckily I got some Lappet faced Vultures to fly low enough to get below the bright light.
But on most images I will have to replace the sky, it was just a white sheet, but the birds were correctly exposed.
I was using my normal technique of using exposure bracketing, keeping aperture at about F=8, speed at 1/3000th and ISO floating up to 3200 and varying the exposure compensation . Most effective at around + 2 stops
I have a lot to sift through and absorb.
Thanks to all who took the time to help me out.

Just as an aside, I use Faststone Image viewer for my first culling viewing of new images.
It however places a date stamp on the images automatically. I do not want them to display.
I have searched the menu and the web but can only find how to edit the stamp but nothing to remove it.
Can anyone help me out?
 
If you have time between shots before the birds flies away - Since you are a raw shooter try increasing exposure until you find the point where first blinkie appears in the brightest part of the scene that you care about. Back off to find the highest non blinking exposure and, depending on your camera, add 2/3 or so stops to that. This will place your brightest highlight as high as it will go without clipping, with plenty of latitude to drag the bird back in lightroom or ACR.
Do you mean 2 thirds of a stop or 2 to 3 stops?
 
Just as an aside, I use Faststone Image viewer for my first culling viewing of new images.
It however places a date stamp on the images automatically. I do not want them to display.
I have searched the menu and the web but can only find how to edit the stamp but nothing to remove it.
Can anyone help me out?

If you mean the info overlay in the top (in my case) LHS, settings>viewer tab>first check box on LHS - show filename in full scree - text - uncheck it.

In this tab there are other options as to the position, colour etc. I don't have any date stamp showing but is literally years since I first set it up but I can get date and other info by moving the cursor to the RHS of the screen right to the very edge and a small window slides out with lots of info including ahistogram etc.

In Settings>thumbnails tab there is a filename check box show/hide too. Can't see anything specifically for date though.

Hi Graham,
I need to clarify, the date stamp only appears on the images when viewed as a slide show, not in single image full screen or in compare mode

I have found a path to change the output of the date stamp, You are able to display the stamp in different formats by inserting text in a window.
By default mine has the Text inserted to enable Date and time taken, which is extracted from the details tab in the exif.
It also has a check box to enable the date stamp text which I have unchecked. I have deleted the text as well, I still get the date stamp.

I have contacted FastStone explaining my problem and hopefully they will be able to sort it out.

Thanks for your interest.

Didn't realise you were talking about the slideshows. There is, as you say, a checkbox for hide/show all text including the date in the pop up that appears when you hit slideshow and mine is unchecked and nothing shows in a slideshow - other then the images 😁.

Presume you have re-started your computer? If yes try re-installing Faststone?
 
Do you mean 2 thirds of a stop or 2 to 3 stops?
With this method two-thirds. But you have to know your camera and how far you can push it. This is most useful shooting raw. Once you get used to it you notice the point where a little 'mottled' bllnkie in camera will still be ok in the raw file. The idea is to 'place' the brightest part you want to have detail as far right on the histogram as possible without clipping, so there is detail to recover without making colors look off. Also you said iso 3200? You lose dynamic range with every increase in ISO, so if you have a little to give on f stop or shutter speed you might try that.

Also, nothing wrong with the sky replacement, especially if it your own sky photo, especially the same sky that was behind the bird. Photoshop now does that automatically.
 
Last edited:
Back
Top