DOF (Doh! Oh Fudge...)

If you would like to post, you'll need to register. Note that if you have a BCG store account, you'll need a new, separate account here (we keep the two sites separate for security purposes).

Robjwilli

Member
Supporting Member
Marketplace
As I prepare for my annual pilgrimage to the bush of South Africa I have been going back though my LR catalog and 'de-cluttering'.
A lot of 'just in case' shots are now surplus to requirements after editing my favourites and what I deemed OK or even good a few years ago no longer makes the cut.
It's actually quite an enjoyable exercise on these dark winter UK evenings and it is interesting to revisit previous trips and see what gear I was using at the time.

One of the things I have identified that I really need to work on is DOF, or rather lack of it. For the majority of time, for solo animals and birds, wide open is the way to go. Get some nice subject isloation, creamy bokeh and lower ISO/sharper images to boot. BUT....I'm really not good at remembering to stop down and my shots of animal pairs or groups are largely a fail.
I have come across many examples where I now wish I had stopped down to a smaller aperture to get both animals/birds in focus....!
(And don't even get me started on close ups of small critters and bugs...lol.)
Anyway, note to self- must consider appropriate aperture more often!

@Steve have you done any videos along these lines? I could do with some tips!
 
Here's a short 7 min video geared towards landscape photographers which you might find interesting. Landscape photographers benefit from a tendency to shoot shorter FL's, something that typical WL photographers aren't always accustomed to. A couple of key points when shooting pairs or groups, namely it's usually better to focus on the more proximate ones (not always depending on the composition) and depending on your FL and distance to your subject, it may not be possible to capture everything in focus. Download a DOF app to your phone and punch in a couple of scenarios to better gauge a sense of DOF and determine whether you can actually achieve the results you're seeking.

 
As I prepare for my annual pilgrimage to the bush of South Africa I have been going back though my LR catalog and 'de-cluttering'.
A lot of 'just in case' shots are now surplus to requirements after editing my favourites and what I deemed OK or even good a few years ago no longer makes the cut.
It's actually quite an enjoyable exercise on these dark winter UK evenings and it is interesting to revisit previous trips and see what gear I was using at the time.

One of the things I have identified that I really need to work on is DOF, or rather lack of it. For the majority of time, for solo animals and birds, wide open is the way to go. Get some nice subject isloation, creamy bokeh and lower ISO/sharper images to boot. BUT....I'm really not good at remembering to stop down and my shots of animal pairs or groups are largely a fail.
I have come across many examples where I now wish I had stopped down to a smaller aperture to get both animals/birds in focus....!
(And don't even get me started on close ups of small critters and bugs...lol.)
Anyway, note to self- must consider appropriate aperture more often!

@Steve have you done any videos along these lines? I could do with some tips!
I am an OM system not a Sony user but I can set up various Custom Sets, though I have not factored in alterations to my aperture....I shoot mostly shutter priority mode.

My immediate thought was surely the likes of the Sony A1 would have such 'personalised' settings.
I found this...,..


Perhaps it is possible to set it up so that pressing a Custom Button will be able to switch your preferred settings to a suitable settings set with smaller aperture to get your desired DoF ???

PS I wish you a safe journey and wonderful safari away from our cold, dank winter.
 
These videos and discussions should be useful


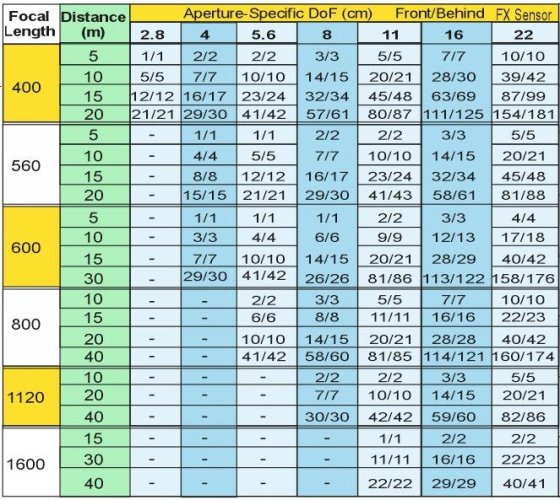
I find a cheat-sheet useful for a summary of DoF relative to magnification and distance, more in this thread


1734066361467.jpeg
You can only see EXIF info for this image if you are logged in.
 

Attachments

  • 1734066361197.jpeg
    1734066361197.jpeg
    118.5 KB · Views: 26
As several factors affect depth of field, understanding their combined effect on real world photography can be challenging.

The chart posted is a very useful guide showing how dof changes from photographically equal both sides of the point of focus in some situations, and starts to change to more dof behind the point of focus in other situation.

For a quick comparison use the chart to compare the shape of dof at 400mm, 15 meters distance f11 & F22 and then 800mm with the same combination.
I find a cheat-sheet useful for a summary of DoF relative to magnification and distance, more in this thread


View attachment 102681

For BIF or close ups of flowers, depth of field is often equal or close to equal both sides of the point of focus and is relatively narrow.

A useful guide for most wildlife photography is closing down 2 apertures when photographing "common" wildlife subjects doubles depth of field.

Not always appreciated is depth of field varies between photographically equal both sides of the point of focus at high subject magnifications; changing to everything that can be resolved by the camera behind the point of focus being sharp at what is called hyperfocal distance.

In-between at one third of HD dof is a quarter of the focus distance in front and half behind.
This is the only focus distance where dof is spilt one third in front and two thirds behind the point of focus.

Hyperfocal distance quadruples when doubling focal length without changing subject distance as subject magnification changes - meaning when wide angles are used HD is relatively close with "deep" dof likely - and when using telephotos HD is much more distant with "shallow" depth of field likely.

For BIF or close ups of animals at relatively high magnifications commonly posted on this forum dof is narrow.

As has been mentioned for landscapes (not commonly posted on this forum) wide angles are more likely to be used.
Landscapes are often 50 feet or more from side to side with negligible subject magnification.
This results in "deep" landscape dof - the opposite of BIF etc.

Beyond this dof gets complicated.
HD varies with viewing conditions meaning it is different for viewing on social media, this site, or making a 12x16 inch print.
It changes when cropping an image.
There can be the complication that some lenses deviate from the marked aperture in close-up work. Shooting at perhaps f4 when the readout says f5.6 can sometimes occur.

I speculate the reason for few dof videos is ideally at least 3 different ones are needed - perhaps one for " birds on a stick", another for landscapes, and another for close-ups.

Somewhat off topic the effect of diffraction on aperture has been mentioned - a subject IMO often misunderstood by "keyboard warriors" rather than experienced real world photographers.

The reality is when a higher MP camera is used image resolution goes up compared to using a lower resolution camera at f11, f16, f22 and even f32.

Resolution does not go up as much as if there was no diffraction effect but it does go up :) - often quite significantly compared to a lower resolution camera.
Sometimes f16 resolution even equals wide-open image resolution.
 
As several factors affect depth of field, understanding their combined effect on real world photography can be challenging.

The chart posted is a very useful guide showing how dof changes from photographically equal both sides of the point of focus in some situations, and starts to change to more dof behind the point of focus in other situation.

For a quick comparison use the chart to compare the shape of dof at 400mm, 15 meters distance f11 & F22 and then 800mm with the same combination.


For BIF or close ups of flowers, depth of field is often equal or close to equal both sides of the point of focus and is relatively narrow.

A useful guide for most wildlife photography is closing down 2 apertures when photographing "common" wildlife subjects doubles depth of field.

Not always appreciated is depth of field varies between photographically equal both sides of the point of focus at high subject magnifications; changing to everything that can be resolved by the camera behind the point of focus being sharp at what is called hyperfocal distance.

In-between at one third of HD dof is a quarter of the focus distance in front and half behind.
This is the only focus distance where dof is spilt one third in front and two thirds behind the point of focus.

Hyperfocal distance quadruples when doubling focal length without changing subject distance as subject magnification changes - meaning when wide angles are used HD is relatively close with "deep" dof likely - and when using telephotos HD is much more distant with "shallow" depth of field likely.

For BIF or close ups of animals at relatively high magnifications commonly posted on this forum dof is narrow.

As has been mentioned for landscapes (not commonly posted on this forum) wide angles are more likely to be used.
Landscapes are often 50 feet or more from side to side with negligible subject magnification.
This results in "deep" landscape dof - the opposite of BIF etc.

Beyond this dof gets complicated.
HD varies with viewing conditions meaning it is different for viewing on social media, this site, or making a 12x16 inch print.
It changes when cropping an image.
There can be the complication that some lenses deviate from the marked aperture in close-up work. Shooting at perhaps f4 when the readout says f5.6 can sometimes occur.

I speculate the reason for few dof videos is ideally at least 3 different ones are needed - perhaps one for " birds on a stick", another for landscapes, and another for close-ups.

Somewhat off topic the effect of diffraction on aperture has been mentioned - a subject IMO often misunderstood by "keyboard warriors" rather than experienced real world photographers.

The reality is when a higher MP camera is used image resolution goes up compared to using a lower resolution camera at f11, f16, f22 and even f32.

Resolution does not go up as much as if there was no diffraction effect but it does go up :) - often quite significantly compared to a lower resolution camera.
Sometimes f16 resolution even equals wide-open image resolution.

This calculator tries to capture some of the nuances of diffraction, the impact of megapixels, sensor size, and also pixel peeping vs. viewing from a distance.

 
This calculator tries to capture some of the nuances of diffraction, the impact of megapixels, sensor size, and also pixel peeping vs. viewing from a distance.

As far as it goes I consider it nearly OK.
In the detail it says:-
"in landscape photography, when you're using a telephoto lens (200mm, 300mm, 500mm), the hyperfocal distance is so large that you cannot focus at it. Since you'll be using small apertures (f/11, f/16, etc.) to maximize depth of field, the rule of the thumb is to focus on a point located in the lower third of the scene. This trick works because when you are using these small apertures and long focal lengths, depth of field usually is distributed 1/3 (33.33%) in front of the focus point and 2/3 (66.66%) behind it. Make sure you're not focusing at infinity, because you'll get blur in the foreground."

There is no escaping as I mentioned earlier DOF formula clarifies the one third - 2 thirds dof split only occurs at a focus distance of one third of HD.

Focussing a telephoto closer than HD - common in wildlife - the split is likely to be close to half and half.

Nikon produced product guides that included DOF table until about 1996.

The Nikon dof figures show with a 300mm at 230 feet focus distance at f22 the depth of field split does not reach 33%/66% - by a long way.
Nikon show 72 feet dof in front and 73 feet behind - still close to an equal split.

"Deep" DOF is difficult with a 400mm even if focussing at a 1 mile distance.

The diffraction calculator I linked only covers diffraction. You must have clicked one of the other links for the text you quoted.
 
Thanks to all for the replies and links to resources. It has made me realise it’s a more complicated situation than I thought but I have a few things to experiment with in my upcoming trip. (y)
 
As I prepare for my annual pilgrimage to the bush of South Africa I have been going back though my LR catalog and 'de-cluttering'.
A lot of 'just in case' shots are now surplus to requirements after editing my favourites and what I deemed OK or even good a few years ago no longer makes the cut.
It's actually quite an enjoyable exercise on these dark winter UK evenings and it is interesting to revisit previous trips and see what gear I was using at the time.

One of the things I have identified that I really need to work on is DOF, or rather lack of it. For the majority of time, for solo animals and birds, wide open is the way to go. Get some nice subject isloation, creamy bokeh and lower ISO/sharper images to boot. BUT....I'm really not good at remembering to stop down and my shots of animal pairs or groups are largely a fail.
I have come across many examples where I now wish I had stopped down to a smaller aperture to get both animals/birds in focus....!
(And don't even get me started on close ups of small critters and bugs...lol.)
Anyway, note to self- must consider appropriate aperture more often!

@Steve have you done any videos along these lines? I could do with some tips!
Sometimes its safer to under-expose an image than risk DOF.
Anti noise software makes Raising the ISO is safer than it used to be.. 🦘
 
One of the things I have identified that I really need to work on is DOF, or rather lack of it. For the majority of time, for solo animals and birds, wide open is the way to go. Get some nice subject isloation, creamy bokeh and lower ISO/sharper images to boot. BUT....I'm really not good at remembering to stop down and my shots of animal pairs or groups are largely a fail.
I have come across many examples where I now wish I had stopped down to a smaller aperture to get both animals/birds in focus....!
I do this far too often. Just missed out on some nice mom&cubs polar bear images because of it...
 
My advice is to make your own " DOF" and distance tests and decide on what lens and settings will work for you.

I have done this in my backyard with stuffed animals where the nose is in front of the eyes. My tests include shooting at different distances from the subject; different distances for the background behind the subject; and different f stops, starting at wide open and then stopping down one or two full stops using each increment of f stop as a possible as an aperture. I usually start at the minimum focus distance for the lens and then increase the distance from the subject. Then I carefully look at the results and come up with my own guidelines for each lens I might use. One foot of distance difference can have a big impact. Focus on the eyes or a point between the eyes and the nose.

I started first with my 300mm f2.8 and my 300mm f4 pf. Each of these lenses has a different minimum focus distance, and this fact alone can have a big decision on which 300mm lens you might use. When I am shooting captured raptors under controlled situations I take both 300mm lenses with me and use the one best suited for the conditions present--usually bad backgrounds that need to be blurred away by shooting the 300mm f2.8 wide open or using the 300mm f4 (it has a closer minimum focus distance ) at a closer distance to the subject, as this will help reduce the impact of bad backgrounds. But when you get closer, the DOF decreases.

The general rule is that the closer you are to the subject the more the background will be blurred, but the DOF will be less. And the longer the focal length of the lens, the narrower will be the DOF range.

I have found that reading manuals and articles helps with your understanding, but your actual tests that you can see with your own eyes teach you the most.
 
Back
Top