Fine Art Printing Resolution

If you would like to post, you'll need to register. Note that if you have a BCG store account, you'll need a new, separate account here (we keep the two sites separate for security purposes).

JoelKlein

Well-known member
Supporting Member
Marketplace
Question;
When printing am uncropped Z8/9 photo to a 24x36, the resolution would drop to 229 DPI
While the Big Epson lab printer would need 300 DPI.
Is this somthing the human eye would see as less sharp?
1730277905780.png


Prining a Z30 photo would be even less.
At 154 DPI
1730278299867.png


Does it mean the biggest I print for a Z30 is 12x18, and Z8/9 18x27 ?
 
The only way you could spot the "lack of resolution" so to speak would be to view it from like 10 inches away..... and youre not going to do that with a large print.
I look at prints at arms length. I enjoy the lush details.
IMG_9100.jpeg
You can only see EXIF info for this image if you are logged in.
IMG_9101.jpeg
You can only see EXIF info for this image if you are logged in.
 
This calculator takes into account print size, viewing distance, and the visual acuity of the viewer. 24x36 at arms length would need 123 pixels per inch for someone with 20/20 vision. Super sharp 20/10 vision would be 246 PPI. The "take it all in" 40 degree distance would be 49 inches, so 70 ppi in that case for 20/20 vision. The reason it changes is prints have their own circle of confusion- the size of a blur that still looks like a sharp point depending on how far away you are and how good your eyes are. If you view a billboard 200 feet away it will look sharp at 20 PPI.


Last edited:
This calculator takes into account print size, viewing distance, and the visual acuity of the viewer. 24x36 at arms length would need 123 pixels per inch for someone with 20/20 vision. Super sharp 20/10 vision would be 246 PPI. The "take it all in" 40 degree distance would be 49 inches, so 70 ppi in that case for 20/20 vision. The reason it changes is prints have their own circle of confusion- the size of a blur that still looks like a sharp point depending on how far away you are and how good your eyes are. If you view a billboard 200 feet away it will look sharp at 20 PPI.


Print labs require 300 DPI.
Who should do the upscaling, Me in Photoshop? (which method?)
Or have WHCC do the upscale.
 
Does it mean the biggest I print for a Z30 is 12x18, and Z8/9 18x27 ?
A couple of points:

- As others have pointed out you don't need to print at 300 dpi or other very high resolutions to end up with a great print at typical and even overly close viewing distances.

- You can interpolate (upsize) images with great results in tools like Lightroom, Photoshop or any of a number of third party tools like Topaz Gigapixel. These processes are very good at stretching the resolution of images as long as the image was sharp and well captured in the first place. Sure you can't go crazy like turn a tiny web post into a huge high quality gallery print but interpolation works very well with modern tools. You can easily print an uncropped Z8 or Z9 image substantially larger than 27"x18" and retain very high quality.

FWIW, back in the early days of digital we were capped at insanely low resolution cameras by today's standards. For instance my Nikon D1H was roughly a 2.7 Megapixel camera and that was one of the flagship cameras of the day. I captured many images with that camera that I carefully interpolated up large enough to print as 30"x20" images that sold and hung in galleries. I just recently sold a few prints of some of those images and though I'd sure wish I could reshoot some of those with my modern gear the images hold up remarkably well given the camera limitations. No, I wouldn't recommend cropping a Z9 image down to 2.7 megapixels and then hoping on interpolation to yield a big, high quality wall print but it's pretty surprising how far images can be enlarged when necessary especially with modern image resizing tools.
 
Print labs require 300 DPI.
Who should do the upscaling, Me in Photoshop? (which method?)
Or have WHCC do the upscale.

No they don't if that was the case the biggest print from a z9 would be 18 x 27. I think these days the big print shops have RIP software that optimizes the file for printing.
 
Last edited:
Question;
When printing am uncropped Z8/9 photo to a 24x36, the resolution would drop to 229 DPI
While the Big Epson lab printer would need 300 DPI.
Is this somthing the human eye would see as less sharp?

In the rarefied air of "fine art prints" sometimes aka Giclee prints 300 dpi is considered standard/minimum and may go to 600 dpi


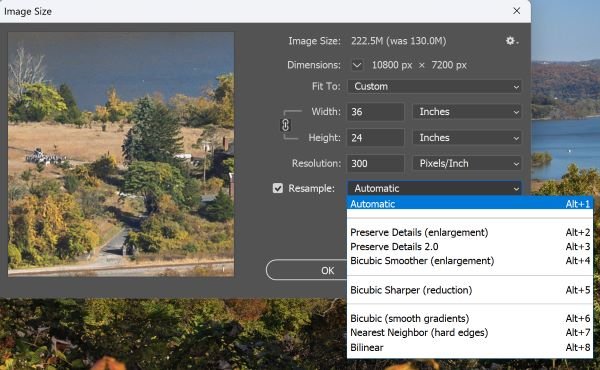
Something as simple as upsizing from 200+ DPI to 300 DPI is simple in Photoshop using the Bicubic Smoother (enlargement) option in the Image>Image Size dialog box. That's actually a very small amount of enlargement.
Bicubic Smoother was something I was confused about...
When creating a new PS document for print,
Which Color mode and Bit depth Do I choose?
1730318719790.png


When resizing, there are also a bunch of options.
Screenshot 2024-10-30 160753.jpg
You can only see EXIF info for this image if you are logged in.


Thanks!
 

Attachments

  • Screenshot 2024-10-30 160753.jpg
    Screenshot 2024-10-30 160753.jpg
    49.6 KB · Views: 3
I am partial to preserve details 2.0. But upsampling is never better than the original file since it has to invent content to do the upsampling. So the software is guessing what should go in the invented pixels. You have more than enough resolution as is for a top quality print.
 
In the rarefied air of "fine art prints" sometimes aka Giclee prints 300 dpi is considered standard/minimum and may go to 600 dpi


It looks like that article is about scanning or photographing an existing paper or canvas work of art to duplicate it, and what settings to use in the scanner or the photo software.
 
I am partial to preserve details 2.0. But upsampling is never better than the original file since it has to invent content to do the upsampling. So the software is guessing what should go in the invented pixels. You have more than enough resolution as is for a top quality print.
How is preserve details 2.0 coming up with new pixels?
 
Bicubic Smoother was something I was confused about...
When creating a new PS document for print,
Which Color mode and Bit depth Do I choose?
Choice of color space (e.g. sRGB, Adobe RGB 1998, etc.) is a big topic but as long as the lab you're working with accepts and reads the color space from the image metadata it doesn't matter too much. All high end labs I've worked with (e.g Bayphoto, Whitehouse, Whitewall, etc.) will read and process according to the color space assigned to your photo. But if working with a more consumer oriented lab it's a safe bet to send them files in sRGB color space.

Personally, I'd say if you haven't learned about color spaces, what it means in terms of reproducible color gamut and understand what your printing lab is capable of, it's best to just stay in sRGB which is always a safe bet. If you do work in a wider color space like Prophoto RGB or Adobe RGB 1998 then it's best to work in a color controlled workflow which includes soft proofing based on your lab's capabilities and print media using .icc color profiles that represent their output capabilities. If you don't do that but work in a wide gamut color space you can get some nasty surprises when the print colors don't look the way you expect them to look.

Unless specifically requested by a lab or photo editor I'll send files out in 8 bit mode. During processing I often work images in hi-bit (16 bit) mode but at the output stage I almost always convert to 8 bit mode.
 
How is preserve details 2.0 coming up with new pixels?
The process is generally known as interpolation and it's using neighboring data to determine a best estimate of the data synthesized during upsizing. There are many different interpolation algorithms ranging from simple nearest neighbor to more sophisticated cubic spline methods but they all use surrounding pixel information to estimate what should fill in between when you upsize an image and need to create additional pixels.

Some of these algorithms are published and common knowledge to signal processing engineers and mathematicians but companies tend not to publish their proprietary methods including the 'smoother' part of bicubic smoother or the specific number crunching in Preserve Details 2.0. Best bet is to try a few methods on copies of the same image you upsize by the same amount and see if you can determine differences and which you like or don't like.

Personally, unless I'm doing some dramatic upscaling I'm very happy with Bicubic Smoother but have used proprietary methods including Preserve Details 2.0 when really pushing the limits on image resizing (tripling, quadrupling the size of an image or more). I like the results but couldn't personally tell the difference on modest upsizing like a 30% to 75% increase in image dimensions.
 
Many inkjet printers use a 240 dpi internal image and a higher dpi image file is sampled and downscaled. The resolution depends greatly on the viewing distance. Photos on billboards are 110 dpi and large posters at 140 dpi look great.

I have made test prints at different dpi settings on 8x10 paper to see what was optimum and what was minimum needed for a given printer. I select the area with the greatest amount of fine detail to use for the 8x10 test print.
 
Choice of color space (e.g. sRGB, Adobe RGB 1998, etc.) is a big topic but as long as the lab you're working with accepts and reads the color space from the image metadata it doesn't matter too much. All high end labs I've worked with (e.g Bayphoto, Whitehouse, Whitewall, etc.) will read and process according to the color space assigned to your photo. But if working with a more consumer oriented lab it's a safe bet to send them files in sRGB color space.

Personally, I'd say if you haven't learned about color spaces, what it means in terms of reproducible color gamut and understand what your printing lab is capable of, it's best to just stay in sRGB which is always a safe bet. If you do work in a wider color space like Prophoto RGB or Adobe RGB 1998 then it's best to work in a color controlled workflow which includes soft proofing based on your lab's capabilities and print media using .icc color profiles that represent their output capabilities. If you don't do that but work in a wide gamut color space you can get some nasty surprises when the print colors don't look the way you expect them to look.

Unless specifically requested by a lab or photo editor I'll send files out in 8 bit mode. During processing I often work images in hi-bit (16 bit) mode but at the output stage I almost always convert to 8 bit mode.
Color profile I’m always working in Adobe 1998. BenQ’s are calibrated to 1998 and WHCC can print it.

My question was regarding color mode. RGB, CYMK, etc.

What would happen if I save a 32bit JPEG? What’s the reason Labs work with 8 bit?
 
How is preserve details 2.0 coming up with new pixels?

All upsizing programs have to invent new pixels. If an image starts at 8256 by 5504 and you upsize to 9000 by 6000 then the software has to create 8,558,976 pixels. The software uses info from the surrounding to do it and they do a good job. But it can't be as good as the original it is based on.
 
Last edited:
Color profile I’m always working in Adobe 1998. BenQ’s are calibrated to 1998 and WHCC can print it.

My question was regarding color mode. RGB, CYMK, etc.

What would happen if I save a 32bit JPEG? What’s the reason Labs work with 8 bit?

Jpeg is always 8 bit. No choice there. Just send the print shop your best in the form they tell you they prefer and trust them to get it right.
 
Last edited:
This is a cut and paste from white house.

Prepare your work for printing by saving high-quality JPEG files with an embedded color profile.

  • Export files tagged with an RGB Color Profile—P3, Adobe RGB, and sRGB are all great options.
  • We recommend saving your files at a JPEG quality of 10 or higher in Photoshop, 90% in Lightroom, or the equivalent in your editing tool.
  • Most products are printed at 300 DPI, and we’ll automatically resize your files for printing. For more precise control, you can resize your files and apply any sharpening before submitting.
 
Back
Top