Layer masks??????

If you would like to post, you'll need to register. Note that if you have a BCG store account, you'll need a new, separate account here (we keep the two sites separate for security purposes).

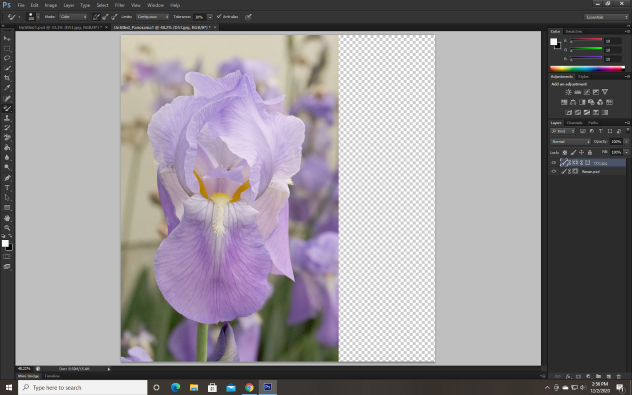
I already have both images reading as layers. On the left side of the screen I have black\white showing. When I set the brush size and attempt to remove an area it wants to use the clone brush and NOT the layer mask brush. After all this I am convinced the layer masking does not work on my CS6. Here is a screen shot of what I have up now.
Screen shot.png
 

Attachments

  • Screen shot.png
    Screen shot.png
    190.9 KB · Views: 140
Last edited:
Layer masking certainly works on CS6, I used that version for years and painted on layer masks all the time.

When you pull down the brush settings panel be careful not to select a clone stamp brush style. IOW, some of the preset brush styles show a small clone stamp in the upper right hand corner in that brush settings drop down palette, if you pick one of those your paint brush will reset to the clone stamp. If all you want to do is resize the brush you might just try selecting the paintbrush and then resizing using the left or right square bracket keys [ or ]
 
Last edited:
I haven't used PS6 in sometime , so don't really recall. However, here are a couple of links that might help you.


I watched the video. I saw when he picked (at bottom of screen) for layer masks. When I pick the same icon I have a no symbol on the end of my cursor. I' m lost.
When you add the layer mask at the bottom of the layer's palette the cursor does not change, all that happens is an all white layer mask is added to the selected layer. The cursor will continue to look appropriate for the current tool selected in the tool palette. For instance if the hand tool happens to be selected you'll see a small hand, if the zoom tool is currently selected you'll see a small magnifying glass for the cursor and if the move tool happens to be selected you'll see the cross hairs symbol for your cursor.

Then when you select a brush you'll see either a very small cross or a circle depending on the current brush size. You can then decrease or increase the brush size by hitting the [ or ] keys.

If the example in the video showed the paint brush cursor style then it just means the paint brush was currently selected when the layer mask was added.

And of course with the all white layer mask you can hide elements on the layer with the mask by painting black on the mask. If you want to hide most of that upper layer and just reveal parts of it then invert the layer mask to all black by hitting CTRL I (CMD I on the Mac) which flips the mask color to black and then flip the selected foreground color to white by hitting X on the keyboard or clicking on the small right angle arrows near the black, white color swatches.
 
I figured out how to move one of the images into correct position. When I set to black all it does is it creates black strokes. The same with changing to white. I put layer masks on both images and still nothing works as advertised.
 
I figured out how to move one of the images into correct position. When I set to black all it does is it creates black strokes. The same with changing to white. I put layer masks on both images and still nothing works as advertised.
If you look at the active layer in the layers palette for a layer that has a layer mask you'll see an outline box around either the actual image layer or around the layer mask. You need to make sure that outline is around the mask, not the actual image as shown by that outline box. To do that you mouse click on the layer mask. Once you select the layer mask instead of the image then painting black on an all white layer mask will hide just those portions of the image and of course painting white on black areas of the mask will reveal those portions.

IOW, if you see black and white lines appearing on your image as you paint you've got the main image selected and not the layer mask so mouse click on the mask icon for the desired layer to select the mask.
 
I saw it work for a minute, however the grid is up in the left top corner. It needs to be centered. How is that done? I finally got it working so how do I move the grid photo into the center of the flower photo?
 
Last edited:
I saw it work for a minute, however the grid is up in the left top corner. It needs to be centered. How is that done? I finally got it working so how do I move the grid photo into the center of the flower photo?
I'm not sure what you mean by the grid photo vs the flower photo. The screenshot you posted is too small and too low resolution to zoom in to see what you have on those two layers.

Generally speaking you'd reposition a selection or smaller photo onto a larger photo by clicking on the layer with the smaller photo and using the move tool (top of the left hand tool palette looks like crosshairs) to click and drag or use the arrow keys to precisely position the smaller image where you want it on top of the larger image. You can't move a locked layer which generally speaking means the bottom or background layer.

You can unlock that background layer by double clicking on the padlock icon on the bottom layer of the layers palette but the typical way to manage that is to have your larger image as the bottom layer and the small image you want to move above it in the layer stack. You can simply click and drag layers upwards or downwards in the layer palette to sequence them differently which might help.

It's not too hard to walk you through the use of layer masks per the title of this thread but for the other issues you're running into it would help to know more about what you're trying to accomplish. Is it a case of putting a small image into a larger image and then hiding portions of that smaller image so only some of it shows in the final processed photo? What exactly is the grid photo? Is that an image you took or a selection out of some other image you dragged on top of the background image or something else?
 
I have 2 photos. One is a grid which duplicates the sensor layout of a D810 or D3. The other photo is a Iris bloom. I need the grid to be centered on the Iris bloom. I'm using this completed photo in a PDF I've written. This photo is used to explain stacking photography with older cameras that do not have stacking built into them.
D51.jpg
You can only see EXIF info for this image if you are logged in.
flower.jpg
You can only see EXIF info for this image if you are logged in.
 
I have 2 photos. One is a grid which duplicates the sensor layout of a D810 or D3. The other photo is a Iris bloom. I need the grid to be centered on the Iris bloom. I'm using this completed photo in a PDF I've written. This photo is used to explain stacking photography with older cameras that do not have stacking built into them.
Got it.

One easy way to do that is to first open the flower photo and then open the grid photo. You'll see both photos appear as tabs up on the top of the PS screen. Click and drag the tab for the grid photo down and to one side or the other and you'll see a portion of it appear on the screen and will see some of the flower photo showing up still centered in the screen. Once you've done that you release the mouse click, then go over and click on the layer for the grid and click-drag it on top of the flower photo. At this point you can either return the grid photo up to the tabs up top (click and drag it until it docks right in next to any other tabbed photos currently open in PS) or you can minimize the grid to have it go down to the bottom of your screen, either way it's no longer in the way.

If you do that you should see the flower with the grid on top of it but the grid will have the white background which you don't really want for this demo and the grid won't be centered over the flower. You can first center the grid by using the move tool (the crossed arrows in the top of the tools palette) to click and drag the grid where you want it.

Then use the Blending mode pull down menu up above the layers in the layers palette (the one that usually says Normal) and change it to Darken. That will get rid of the white background on the grid just leaving the black lines and boxes. Basically Darken mode means only add the parts of the top image that are darker than the underlying flower image which only leaves the black grid.

If you do that you'll end up with an image that looks something like this:

grid-flower1.jpg
You can only see EXIF info for this image if you are logged in.


If you want the grid to span a larger part of the frame or all of the frame you can either resize the grid image to larger dimensions before dragging it onto the flower image or you can use the Free Transform tool on the grid layer by hitting Ctrl-T (Cmd-T on a Mac) and drag one of the corners up or down to resize the image and then recenter with the move tool if necessary. Hold the shift key down while dragging corners of the Free Transform to maintain the same aspect ratio (horizontal size to vertical size ratio), IOW to keep the grid proportioned correctly and not stretched thin or wide.

For instance a quick Free Transform of the grid layer could give you this:

grid-flower2.jpg
You can only see EXIF info for this image if you are logged in.


Lot's of ways to get what you want, but basically it comes down to:

- Get both images in a file layered with the grid above the flower (click drag layers to rearrange the ordering if necessary so the grid is up top)
- Position the grid as desired with the Move tool (crossed arrows on top of the tool palette or just hit V on the keyboard to select the move tool) as necessary
- Use the Free Transform tool to resize the grid as desired and reposition with the move tool if necessary
- Change the layer blending mode on the grid layer to Darken to remove all the white background on the grid

Hope that makes sense.

No real need to use layer masks at all for dropping a grid over an image. Using layers makes it easy, but masks are not necessary for this task.
 
Last edited:
Thank you very much. I cheated the system, I save the target as and now its ready for the PDF later today. I have both images open and the auto-blend mode is grayed out and I'm not finding layer blending mode to darken the white areas.
 
Thank you very much. I cheated the system, I save the target as and now its ready for the PDF later today. I have both images open and the auto-blend mode is grayed out and I'm not finding layer blending mode to darken the white areas.
There are two pull down menus in the layers palette, it's the lower one that sets the blending mode and where you'll find the Darken option. It's shown here:
darken layer mode.jpg
You can only see EXIF info for this image if you are logged in.


Basically you're trying to get your layers palette to look like this:
layers darken 2.jpg
You can only see EXIF info for this image if you are logged in.


If that blending mode drop down menu is grayed out you most likely have the Background layer (the flower image) selected. As shown in the screenshot of the layer's palette above, the upper layer with the grid must be selected by clicking on it which will turn the layer a different shade of gray and put that white outline box around the grid thumbnail. Basically the blending mode applies to the selected layer and you cannot and do not want to change the blending mode of the locked background layer so make sure you've got the upper layer with the grid image selected as shown above.
 
Last edited:
I have no Idea of what I am doing. This is so far out of my wheelhouse I am totally lost so I'm giving up on this idea. Thank you very much for the work you put on this. I was able to use what you did so all is not lost. I've had no formal training in Photoshop. I get along fine with my birds, eagles, hawks, fox and bears, but something like this really strains me mentally. Thanks again.
 
Fair enough, but if you want to learn more about PS including how to use layers and masks I’d highly recommend Scott Kelby’s books on PS for digital photographers. Any version of his book would work for basic concepts but you can likely find a CS6 version on eBay or the used market. He makes this stuff very easy to understand.

You can find the CS6 version of his PS book here for less than five bucks: https://www.thriftbooks.com/w/the-a...UhoCUoEQAvD_BwE#idiq=19397533&edition=7983117
 
Last edited:
Back
Top