One Year Later - Still chewing on Post - thanks for all the learning

If you would like to post, you'll need to register. Note that if you have a BCG store account, you'll need a new, separate account here (we keep the two sites separate for security purposes).

BarkingBeans Coffee

Michael H
Supporting Member
Marketplace
A year ago, I came home from South Africa, and watched @Steve's processing video and whet through my images. I used the Nikon Camera standard profile.
I have been watching and learning from many of you and have adopted new processing that goes beyond LRc when needed. I am usually starting with the Nikon Linear Profile now which is really dull but perks up by using Auto.

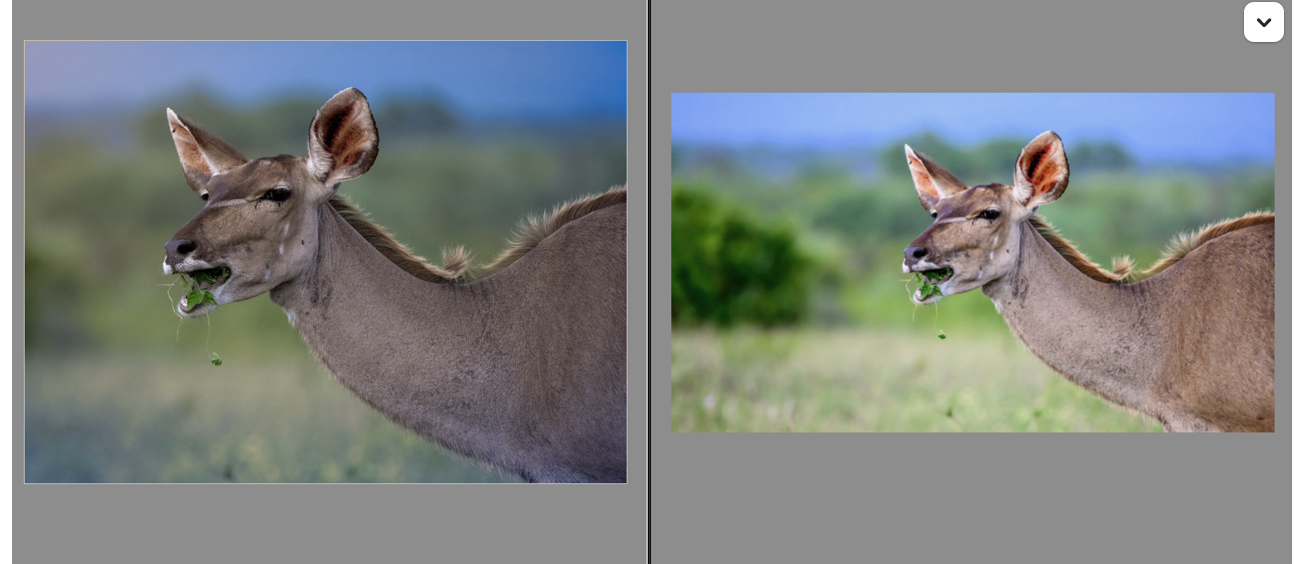
Some of the steps chewing on this one led to a new image on the left and linked, compared to what I did a year ago on the right.

Color Balance - curves layer with auto set to Snap Neutral Midtones, and Find Dark and Light Colors, but the real trick in some cases, create a 50% fill layer set to difference. Black pixels are true 50% grey so use the color picker to select one, discard the layer, go back to curves and use that for the mid point.
Crop to remove distracting bush in background on the left
Add a bit of contrast to the head only, a bit of saturation to the green snack.
Although I didn't do it here, I try to consider how the eyes look and adjust those.
Used Vivid Light Sharpening action from PixImperfect. The function in this kicks Topaz as you can adjust it as it uses a Gaussian Blur Smart Object (yes blur to sharpen), and you have the full AI masking of PS.
Finally a very slight vignette with a bluish cast, exuding highlights.

Special thanks to @Winston Churchill (Sir) for dialog that helped me refine what I am up too.

Haven't finished chewing yet - lots to learn every day - seems more natural and accurate to me than what I did before.



1699729276884.png
 
I wanted to ask you about that method to auto correct the colors in curves (or levels). I do that too, but after I use difference to find the grey point, I am unable to set it from within the auto window. There all I get is white when I click on the spot. I do have all layers checked. I have to end up either clicking OK for the auto and then setting the grey point using the eyedropper buttons, or simply remembering the values and typing them in.

Can you tell the specifics of how you handle that?
 
Last edited:
I think i may have sorted part of it, as I had the layer mask selected rather than the curves thumbnail, still I would appreciate the details on how you do it.
 
I think i may have sorted part of it, as I had the layer mask selected rather than the curves thumbnail, still I would appreciate the details on how you do it.
Bill can't do it in the auto window

Add curves adjustment layer and then Cmd-G to clip it.
Above base layer add 50% grey and set to difference
With the 50% grey layer selected, use the COLOR SAMPLER tool to mark one or more black spots.
Delete the 50% grey layer.
Now on the curves layer hit auto and then use the Mid Point tool (left side of Properties box not in the Auto dialog box) to pick that Sampled spot.
Go back to the Color Sampler and click Clear All to remove the sample.

Hope that helps
 
Th
Bill can't do it in the auto window

Add curves adjustment layer and then Cmd-G to clip it.
Above base layer add 50% grey and set to difference
With the 50% grey layer selected, use the COLOR SAMPLER tool to mark one or more black spots.
Delete the 50% grey layer.
Now on the curves layer hit auto and then use the Mid Point tool (left side of Properties box not in the Auto dialog box) to pick that Sampled spot.
Go back to the Color Sampler and click Clear All to remove the sample.

Hope that helps
That makes sense. So what in your view is the purpose of the midpoint selection boxes within the auto part of the curves? The box that is gray that you can click to set a new color.
 
I think you can redefine what is neutral grey for the auto function so its is a generic application and not image specific.

Auto Color Options

Interesting read - not sure I fully grasp it all.

From that page:
To assign (target) color values to the darkest, neutral, and lightest areas of an image, click a color swatch.

That's the part that was confusing me. As I found out you have to have the curve thumbnail selected to be able to do that, not the mask which for some reason they automatically select the mask.
 
A year ago, I came home from South Africa, and watched @Steve's processing video and whet through my images. I used the Nikon Camera standard profile.
I have been watching and learning from many of you and have adopted new processing that goes beyond LRc when needed. I am usually starting with the Nikon Linear Profile now which is really dull but perks up by using Auto.

Some of the steps chewing on this one led to a new image on the left and linked, compared to what I did a year ago on the right.

Color Balance - curves layer with auto set to Snap Neutral Midtones, and Find Dark and Light Colors, but the real trick in some cases, create a 50% fill layer set to difference. Black pixels are true 50% grey so use the color picker to select one, discard the layer, go back to curves and use that for the mid point.
Crop to remove distracting bush in background on the left
Add a bit of contrast to the head only, a bit of saturation to the green snack.
Although I didn't do it here, I try to consider how the eyes look and adjust those.
Used Vivid Light Sharpening action from PixImperfect. The function in this kicks Topaz as you can adjust it as it uses a Gaussian Blur Smart Object (yes blur to sharpen), and you have the full AI masking of PS.
Finally a very slight vignette with a bluish cast, exuding highlights.

Special thanks to @Winston Churchill (Sir) for dialog that helped me refine what I am up too.

Haven't finished chewing yet - lots to learn every day - seems more natural and accurate to me than what I did before.


View attachment 74094
👍👍
 
FWIW - I made an Action to do the Mid Point work. If anyone wants it PM me with your email address.
One thing I didn't mention is I turn the curves layer blending mode to luminosity.

Edit - modified the action to select the bottom most layer even it isn't called Background.
 
Last edited:
FWIW - I made an Action to do the Mid Point work. If anyone wants it PM me with your email address.
One thing I didn't mention is I turn the curves layer blending mode to luminosity.

Edit - modified the action to select the bottom most layer even it isn't called Background.
Remember to check this visually - if Luminosity blending mode isn't to your liking - check it against "normal" before committing to the final changes.
 
Back
Top