Question about min/max on sharpening and luminance -2 duck vs 3 duck

If you would like to post, you'll need to register. Note that if you have a BCG store account, you'll need a new, separate account here (we keep the two sites separate for security purposes).

gpsman

Well-known member
Supporting Member
Marketplace
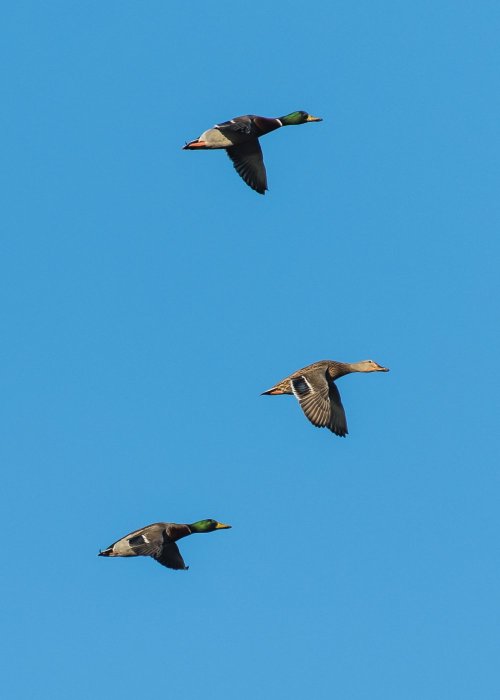
I am posting a couple of pictures of Mallards in flight. I'm just trying things out. They look ok to me. However, I can mess with luminance and sharpening all day and see things slightly change. I usually go max and min on the sliders to find a happy medium. Is there a more scientific/technical method or does it come down to what you like and what looks good? Pics look better on the phone screen than on the big screen. Ducks are about 75ft away. f 5.6 , 500mm, ISO 500 SS/1600 Nikon D850 I tend to crop heavily. There are actually 4 ducks in the shot. Maybe I shouldn't do that. Comments, suggestions welcome.
Mallard 11-4 6.jpg
You can only see EXIF info for this image if you are logged in.
 

Attachments

  • Mallard 11-4 4.jpg
    Mallard 11-4 4.jpg
    80.5 KB · Views: 107
I am posting a couple of pictures of Mallards in flight. I'm just trying things out. They look ok to me. However, I can mess with luminance and sharpening all day and see things slightly change. I usually go max and min on the sliders to find a happy medium. Is there a more scientific/technical method or does it come down to what you like and what looks good? Pics look better on the phone screen than on the big screen. Ducks are about 75ft away. f 5.6 , 500mm, ISO 500 SS/1600 Nikon D850 I tend to crop heavily. There are actually 4 ducks in the shot. Maybe I shouldn't do that. Comments, suggestions welcome.

From my point of view, there are some problems with the photo.
There is some chromatic aberration below the wings. (Blue colour).
The subject looks more distant; when the photos are not sharp, there is no way to correct the problem on the computer.
You can try to increase the texture and the clarity to improve the sharpness, but you can not create the detail of the plumage if not there.

Regarding the workflow, it is essential to make the sharpening adjustment with the view set at 100% magnification on a good-quality monitor.
One of not know advantages of an expensive monitor is not only the colour gamut of reproduction and the fidelity of the colour but also the massive difference in contrast/sharpening. With a professional monitor, you can see every step when you increase the sharpening value; with the cheapest one, you are lucky if you can see any difference when you increase the value by 10 by 10 units.

If an expensive monitor is not on the budget or you do not have the space to place it, you can try to connect an excellent tablet to the computer as a second monitor.
If, for example, you have an Ipad of a recent generation, the display's quality is usually higher than a standard notebook screen.

Please, take my word for friendly help; I do not intend to be critical of you.
I also remain at your disposal for any questions or clarifications.
 
The second image is better than the first, probably because it was not cropped as much. With the first image you've lost too much detail due to what looks like a heavy crop. My opinion is that the image cannot be improved any more. The more you can fill the frame and the less you crop, the better the image will be.
 
I am posting a couple of pictures of Mallards in flight. I'm just trying things out. They look ok to me. However, I can mess with luminance and sharpening all day and see things slightly change. I usually go max and min on the sliders to find a happy medium. Is there a more scientific/technical method or does it come down to what you like and what looks good? Pics look better on the phone screen than on the big screen. Ducks are about 75ft away. f 5.6 , 500mm, ISO 500 SS/1600 Nikon D850 I tend to crop heavily. There are actually 4 ducks in the shot. Maybe I shouldn't do that. Comments, suggestions welcome.
Some thoughts:

- As others have posted, heavy cropping generally hurts an image and reveals any capture issues like lack of sharpness or noise issues so the best starting point is to find ways to fill more of the frame by getting closer, using longer lenses or both. @Steve has a great blog post on the problems associated with relying on heavy crops:

- Similarly as posted above, for flight shots a bit more shutter speed almost always helps.

- In terms of how much to sharpen, pay close attention to high contrast edges like where the ducks wings meet the blue sky. As you increase sharpening at some point you'll see dark and light halos appear at those high contrast edges. One of the big giveaways of over sharpening is those strong halos which appear in your first image so keep an eye on that during processing and sharpen below the point where halos appear. Since it seems you're working in LR, use the On/Off toggles or jumping back in forth in the History to see how much sharpening you're applying and tune it down to the point below which obvious artifacts like those halos are visible. This works for more than sharpening, learning to toggle the various editing groups within the Develop Module on and off can help you see when you've gone too far or not far enough with something like Shadow or Highlight pulls, exposure changes, saturation changes and the like. This is even easier to see in Photoshop by toggling the visibility of adjustment layers but it can be done in Lightroom as well by toggling the little On/Off icons associated with each portion of the Develop interface.
 
... it is essential to make the sharpening adjustment with the view set at 100% magnification on a good-quality monitor...
"Essential" may be a bit strong. Plus the amount of effort and investment should be fit for purpose(and available resources). My own sharpening technique varies based on the intended end result of the image. Then again maybe my work is crap and this is partly why... o_O
 
I try to shoot at 1/3200 or even faster with flying ducks in good light. They fly fast and a fast shutter speed will greatly reduce subject blur. When shooting multiple birds in flight, I try to use f/8 of even smaller when possible to maximize depth of field. Just a couple of ideas for you.

As far as sharpening, it's a by the eye thing as far as I'm concerned. I tend to sharpen first, then add luminance in Lightroom. That said, I pretty much use Topaz DeNoise and if needed Sharpen AI instead of the Lightroom sharpening and noise plug-in tools these days. Of course, there are lots of ways to get from point A to B, I'm just giving you the workflow I have found to be best for my work.
 
Wow, thank you all for your help and support. All incredibly good suggestions. It appears I have my work cut out with plenty of room for improvement.

Thanks again
 
"Essential" may be a bit strong. Plus the amount of effort and investment should be fit for purpose(and available resources). My own sharpening technique varies based on the intended end result of the image. Then again maybe my work is crap and this is partly why... o_O
First of all, I like your photos, and I hope sooner or later to be lucky enough to visit Alaska with the hope of making my own.

Yes, maybe "essential" is a strong word, :cool: but it was necessary to highlight the point that to evaluate the sharpening is always suggested to view the image at 100%. Please also consider that English it's not my mother tongue ....:cry:

You also have the right that the sharpening depends on the image's final destination.
See on-screen, print on paper, request different sharpening values. Many programs give you some suggestions or automation to do that correctly. For example, in the Export command inside Lightroom, there is a specific panel.

Another important detail to not forget is to check and, if necessary, apply the sharpening after the picture's size reduction.
In the same way that the digital noise will be reduced during the resizing of an image to a smaller size, also the sharpening will be affected by the reduction.
Marco, I understand you perfectly. Thanks for the feedback and suggestions. I’ll follow up on those.
 
...Another important detail to not forget is to check and, if necessary, apply the sharpening after the picture's size reduction.
In the same way that the digital noise will be reduced during the resizing of an image to a smaller size, also the sharpening will be affected by the reduction.
I take this one step further. For serious work sharpening is the last step in my work flow. I find it extremely useful to resize prior to sharpening. Doing so minimizes artifacts associated with sharpening and gives the best look at the end result in-process. To go even a step further as one last check prior to printing large prints I will resize the image to "life size" on my monitor. Not a perfect comparison to what the print will look like but I find it useful.

I long ago stopped using 100 percent view when sharpening. In spite of what Adobe and some others recommend I just don't find it useful. The only exception to that is if I'm having trouble with some sort of artifacts, color fringing, etc, that I'm trying to figure out.
I do not discover problems with artefacts or any other issue with my sharpening technique.
A part of my standard workflow is to work on a photo in a 16-bit version and Adobe RGB colour profile. I make all the necessary adjustments and save it in TIFF format to store the best possible version of the photo just in case I need it to print. Then, I convert it into sRGB, taking care of any possible colour variation. Sometimes the red colour can shift on different tonality. Finally, I resized it to a smaller size for the web or posts in this blog. The last passage is to check the sharpening with the photos at full size.

As I mentioned some post ago, I found a big difference in my workflow standard setting after I upgraded my monitor to a professional one.
Now my photos need less sharpening and less colour (contrast) correction.

We spend a lot of money on photographic equipment and then underestimate the importance of a good monitor.
Last year I decided to put it on my priority list of things to buy, money permitting, and I am pleased I did.
 
...We spend a lot of money on photographic equipment and then underestimate the importance of a good monitor...
Particularly if producing prints is the end goal a calibrated high quality monitor is certainly an important tool. Without it there is a lot of trial and error involved in achieving desired results.
 
Back
Top