
Nikon d850, on tripod, w/ old 600 mm F4 with TC 1.4. w/o VR. 1/1250 sec, f 5.6, ISO 500 , + 1.33 EV. Estero-llano-grande park, Texas. The original was moderately overexposed. due too much EV. Sun angle was better than I thought thus overexposed. Moderate crop. Processing: adjusted exposure, denoise, sharpening ,and blurred background all in LR , Also curves adjustment for color . ? More crop from the left , cleanup whitewash on log. Comments welcome. (Uncertain if I got the file size and dimensions correct) Please let me know.
You are using an out of date browser. It may not display this or other websites correctly.
You should upgrade or use an alternative browser.
You should upgrade or use an alternative browser.
Roseate Spoonbill
- Thread starter ray rozema
- Start date
If you would like to post, you'll need to register. Note that if you have a BCG store account, you'll need a new, separate account here (we keep the two sites separate for security purposes).
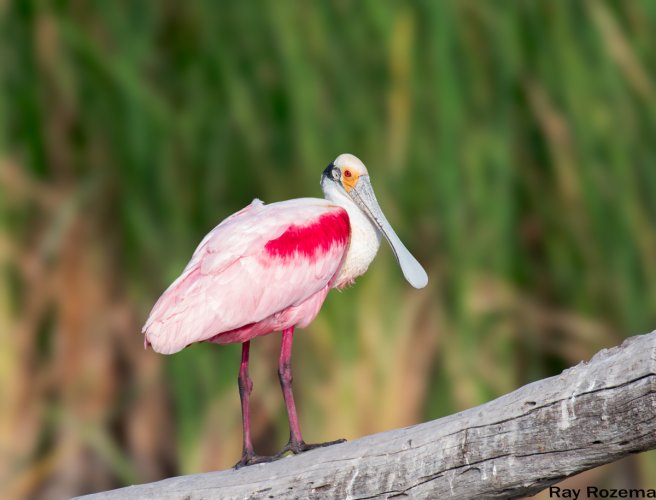
Ray this is a beautiful image, and a beautiful bird. It looks like the bird is wearing headphones 
My suggestion would be to use a curves layer (Luminosity blend mode) - input 218 - reduce to output something like 200
this will take the edge off the brightness and make the bird pop even more, as well as bring out detail that is already in the bird, and make the tree stump less bright and in your face. You could do similar adjustments in ACR or LR of course.
Personally I prefer a standard crop (very subjective I know) 6x4, and crop slightly by reducing a bit on the left and a bit on the top.
Why crop a lttle on the left?Ray this is a beautiful image, and a beautiful bird. It looks like the bird is wearing headphones
My suggestion would be to use a curves layer (Luminosity blend mode) - input 218 - reduce to output something like 200
this will take the edge off the brightness and make the bird pop even more, as well as bring out detail that is already in the bird, and make the tree stump less bright and in your face. You could do similar adjustments in ACR or LR of course.
Personally I prefer a standard crop (very subjective I know) 6x4, and crop slightly by reducing a bit on the left and a bit on the top.
Thanks for the advice. I'm aware of curves adjustment layer in Photoshop but I don't know how to do what you are suggesting. Please elaborate.
Thanks
Thanks
Roy -
Two ways - you can find the input value on the curves layer - or what I did - find a spot on the beak - more or less at 218 (anything around that value give or take 10 - you dont have to be that precise). When you click on the beak at the that value - it will insert a point on the curves layer (that white dot on the graph. Then pull that point down to around 200 (or use your down arrow keys and pull it down that way. Does that help?

Two ways - you can find the input value on the curves layer - or what I did - find a spot on the beak - more or less at 218 (anything around that value give or take 10 - you dont have to be that precise). When you click on the beak at the that value - it will insert a point on the curves layer (that white dot on the graph. Then pull that point down to around 200 (or use your down arrow keys and pull it down that way. Does that help?
Guido Bee
Member
Thanks for your explanation. I need to try this on some of my shots.Roy -
Two ways - you can find the input value on the curves layer - or what I did - find a spot on the beak - more or less at 218 (anything around that value give or take 10 - you dont have to be that precise). When you click on the beak at the that value - it will insert a point on the curves layer (that white dot on the graph. Then pull that point down to around 200 (or use your down arrow keys and pull it down that way. Does that help?
View attachment 84356
I have never much used the curves functions, and did not at all know about the brightness of the image (beak in this case) to determine where to "pull or push" the curve.
This may help me in a lot of cases. I generally find what I need in other ways, but this could make a real difference. Thanks again.
Remember this is a global adjustment - and if you dont want it to affect the whole image, brush back with black on your mask on the areas you dont want the effect of the curves
If you do this in ACR / LR, you can use the mask feature, select the subject and then only bring the exposure or highlight or whites down till you are happy with the results. It's a question of playing around - dont be scared to try new things.
Also - if you find too much of a colour shift with curves - change the blending mode from Normal to Luminosity
Guido Bee
Member
One of my issues is that LR and PS are not the programs I use. PhotoLab (DXO) is somewhat different and I have to do some interpretting from one protocol to the other.
Does not always happen gracefully of right away. Kind of stumbling around in the dark. Thanks for your advice; I'll see if I can get from the LR / PS world over to DXO-land.
All the best.
Does not always happen gracefully of right away. Kind of stumbling around in the dark. Thanks for your advice; I'll see if I can get from the LR / PS world over to DXO-land.
All the best.
I am sorry - I assumed you use Photoshop when you were referring to curves - blond of me to not think further than my nose! But you get the idea - Perhaps there are others here that can advise on DXO.
Guido Bee
Member
Not to worry, between DXO and NX Studio, I am finding my way toward what you describe. I always appreciate a bit of help and direction.I am sorry - I assumed you use Photoshop when you were referring to curves - blond of me to not think further than my nose! But you get the idea - Perhaps there are others here that can advise on DXO.
Thanks, and all the best.
Thanks for the additional instructionRoy -
Two ways - you can find the input value on the curves layer - or what I did - find a spot on the beak - more or less at 218 (anything around that value give or take 10 - you dont have to be that precise). When you click on the beak at the that value - it will insert a point on the curves layer (that white dot on the graph. Then pull that point down to around 200 (or use your down arrow keys and pull it down that way. Does that help?
View attachment 84356