How to improve this photograph?

If you would like to post, you'll need to register. Note that if you have a BCG store account, you'll need a new, separate account here (we keep the two sites separate for security purposes).

Cristobal

Well-known member
Supporting Member
Marketplace
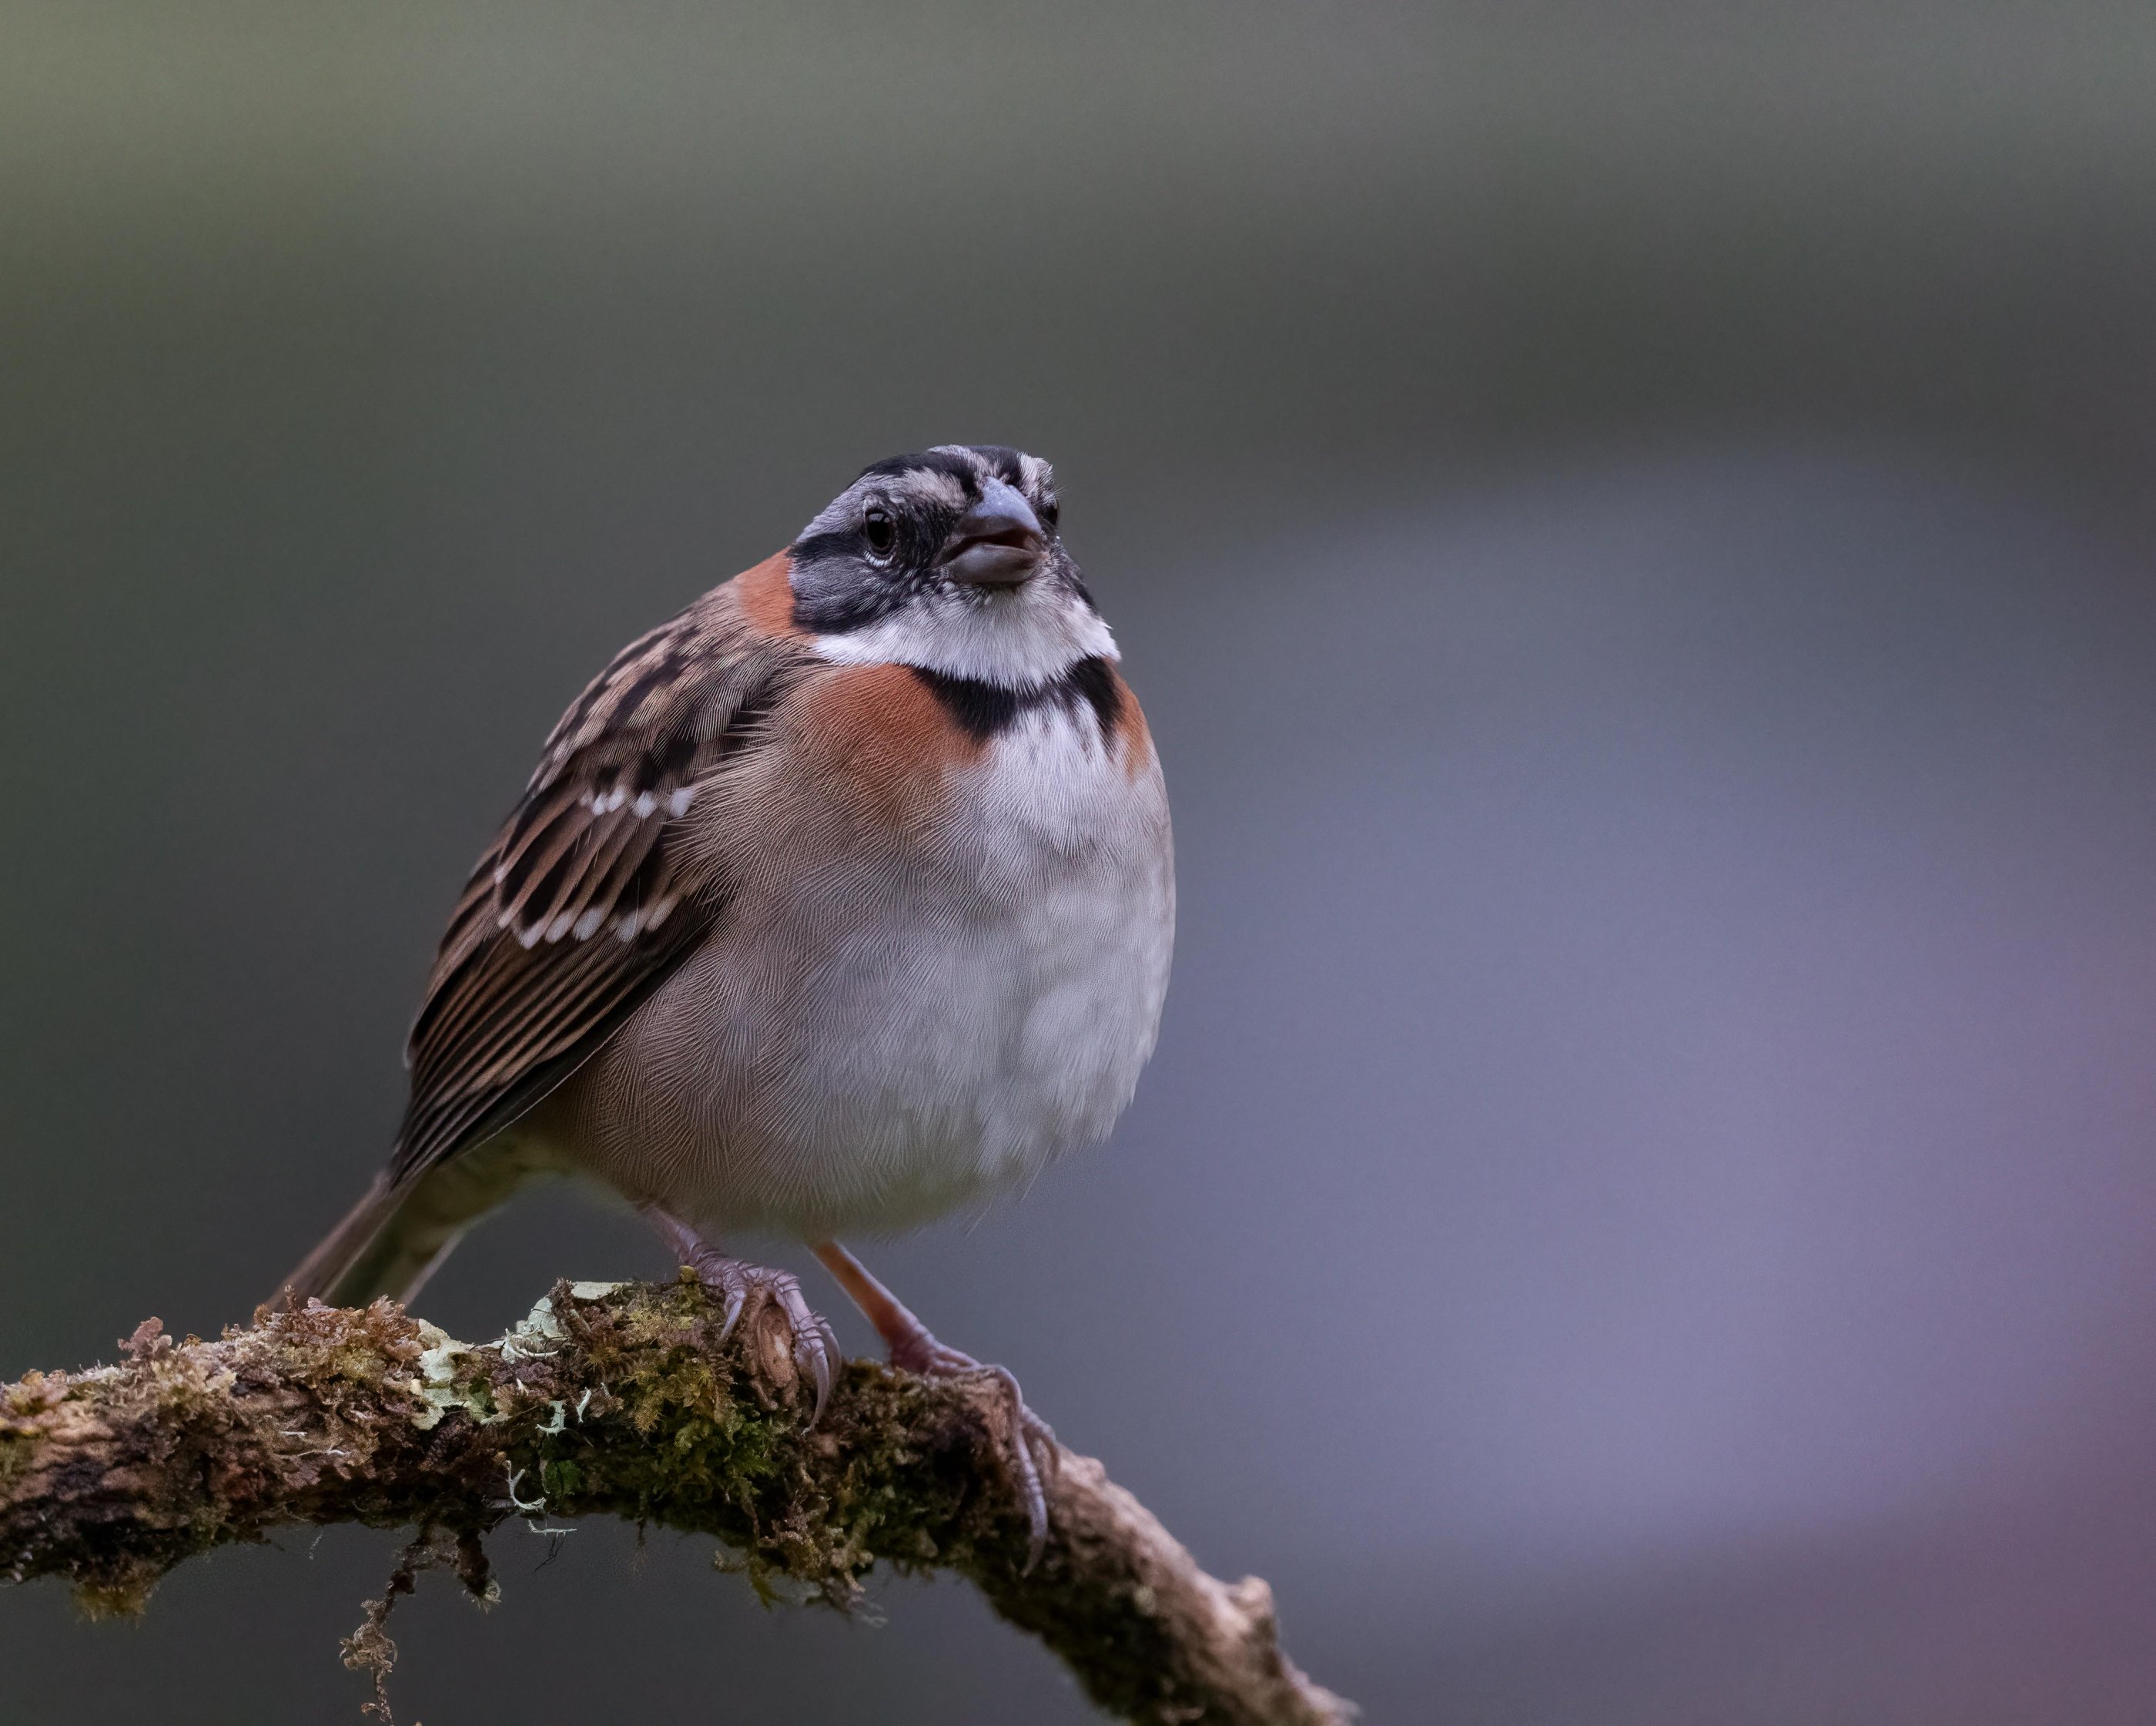
I like this photo taken last year in Costa Rica; the bird, a rufous-collared sparrow, seems to have a lot of confidence with what might make you think to a bow tie; but, the background is partly ruined by a kind of highlight; my main post-processing tool is Lightroom classic and I tried unsuccessfully to make a more uniform background with masks. May be you will have some suggestions to give me. Thank you in advance!
CS0_9817-Modifier.jpg
You can only see EXIF info for this image if you are logged in.
 
Other than replacing the background, removing the bright portion of the background will be very difficult. And even that would be better done in PS.

The image looks under-exposed, maybe from changes you made when trying to darken the background. I had a quick play. In LR/ACR, I selected the subject and branch and increase exposure.

Then I inverted the selection and brightened the background, took highlights to -0- and reduce white just a touch. Most importantly I then took the clarity slider to -100 (or whatever the extreme left is.)

Screenshot 2024-03-30 175033.jpg
You can only see EXIF info for this image if you are logged in.
 
So after my adjustments in Post #4, I took the image into PS, duplicated the layer, masked in black the subject and perch. Then selected a color from the background, and brushed over the brighter parts of the background. The color banding is from working with such a low resolution image created when I screen printed it..... Generally you would not get this banding on a full resolution image unless you were doing extreme adjustments, which I was not doing.

i-MPR8zgZ-L.jpg
 
Last edited:
Honestly, I don't find it distracting. If you had not mentioned it, I would have been looking at the bird and not paying attention to the out of focus background. nature is messy, animals don't pose for us like models in a studio and they sure don't live their lives according to our time schedules or photographic desires. This is where the bird was and you captured it where it lives, I wouldn't worry about the bright spot if it were my photo. The only thing I would do is mess around with boosting the shadows a little and overall brightness. The bird's face is a little dark but that is a minor nit pick.
 
The image appears to have been shot in low light or underexposed, it's hard to know since no explanation or metadata is included. When that happens with my shots, even at low ISO, I use Topaz denoise and most often it is an overall improvement, you may want to try that first. Often I'll simply hit the Auto button in LrC to see what it does and adjust from there. If not using the Auto button I'll first adjust the whites based on the histogram, pulling them all the way to the right to see what the image looks like and then adjusting to taste from there. After that I'll pull up the darks based on the histogram, especially if the shadows are blocked. Then I'll pull up the midtones using the Exposure slider. If there is white in the image I'll carefully check to ensure that nothing is blown out and that the white is actually white, not gray. All of this is done to my taste and to what the image will allow me to do. I tend to like bright photographs but I see a lot of dark photos on this site so obviously many people like dark photographs. I'm always looking for that "bright, happy world" and that is what I'd like to convey with my images so I process that way. I don't mind the lighter spot (it is, after all, not a studio background) in your image but if it were my image I'd try to change the purple hue of the brighter part, although that might lighten up a bit if you were to increase the midtones. Processing is a matter of taste to some degree so if you are happy with the image then that is all that counts as long as you are not entering it in a competition of some sort, where processing then does matter a lot. I cannot process the image to show you what I might do since I cannot download it, apparently the moderators can do that.
 
So after my adjustments in Post #4, I took the image into PS, duplicated the layer, masked in black the subject and perch. Then selected a color from the background, and brushed over the brighter parts of the background. The color banding is from working with such a low resolution image created when I screen printed it..... Generally you would not get this banding on a full resolution image unless you were doing extreme adjustments, which I was not doing.

i-MPR8zgZ-L.jpg
Thank you very much for telling me how to proceed to achieve such a result which is very convincing and meets my expectations; unfortunately, I was able to go through all the stages except the last one in Photoshop; I am sadly not familiar with photoshop; may be you know some tutorial allowing me to learn how to select a color from the background and brush over the brighter parts of it. The image was taken at iso 4000 , and 1/250 with a monopod at f/5.6, which explains that it is underexposed; I used first Denoise al to remove noise.
 
After opening the image in PS, duplicate the background. (Cntl+J on a PC)

Then in the Tools panel select the eyedropper. Now click in the area that has the color you want. That will result in selecting that color.

Then in the Tools panel select the brush. At the top you can select what opacity you want and how hard or soft you want the brush. I generally use 0 = very soft. In this case I used 100% opacity.

Now with the brush, brush over the area you want to affect.

Photoshop is extremely complex. Trying to learn it piece meal is too random, IMHO. I suggest you invest the time and a bit of money to attend or purchase a beginner's series of lessons in order to learn PS. Once you get a solid basic understanding of the software, you can then gradually learn new features over time.
 
After opening the image in PS, duplicate the background. (Cntl+J on a PC)

Then in the Tools panel select the eyedropper. Now click in the area that has the color you want. That will result in selecting that color.

Then in the Tools panel select the brush. At the top you can select what opacity you want and how hard or soft you want the brush. I generally use 0 = very soft. In this case I used 100% opacity.

Now with the brush, brush over the area you want to affect.

Photoshop is extremely complex. Trying to learn it piece meal is to random, IMHO. I suggest you invest the time and a bit of money to attend or purchase a beginner's series of lessons in order to learn PS. Once you get a solid basic understanding of the software, you can then gradually learn new features over time.
Thank you again for your help; here is after many tests a new background may be a little artificial but, I will go further now after this recent practice in Photoshop and will buy a series of lessons as I did with some aspects of Lightroom classic especially with masks.
CS0_9817-.jpg
You can only see EXIF info for this image if you are logged in.
 
Honestly, I don't find it distracting. If you had not mentioned it, I would have been looking at the bird and not paying attention to the out of focus background. nature is messy, animals don't pose for us like models in a studio and they sure don't live their lives according to our time schedules or photographic desires. This is where the bird was and you captured it where it lives, I wouldn't worry about the bright spot if it were my photo. The only thing I would do is mess around with boosting the shadows a little and overall brightness. The bird's face is a little dark but that is a minor nit pick.
Thank you for your feedback! I am not a fan of an absolutly clean and smooth background but in this case, I find the presence of this halo of light a little disturbing.
 
I would try a radial gradient over the highlight, lower the exposure there, then subtract the subject. Just an idea to try. This has worked well for me at times.
Thank you for your recommandation; I tried earlier using the radial gradient but I didn't like the result.
 
Thank you again for your help; here is after many tests a new background may be a little artificial but, I will go further now after this recent practice in Photoshop and will buy a series of lessons as I did with some aspects of Lightroom classic especially with masks.View attachment 85662
Excellent work! Generally working in LrC and PS is not hard.....it just that sometimes you "don't know what you don't know"! ;)

So happy I could help!
 
The image appears to have been shot in low light or underexposed, it's hard to know since no explanation or metadata is included. When that happens with my shots, even at low ISO, I use Topaz denoise and most often it is an overall improvement, you may want to try that first. Often I'll simply hit the Auto button in LrC to see what it does and adjust from there. If not using the Auto button I'll first adjust the whites based on the histogram, pulling them all the way to the right to see what the image looks like and then adjusting to taste from there. After that I'll pull up the darks based on the histogram, especially if the shadows are blocked. Then I'll pull up the midtones using the Exposure slider. If there is white in the image I'll carefully check to ensure that nothing is blown out and that the white is actually white, not gray. All of this is done to my taste and to what the image will allow me to do. I tend to like bright photographs but I see a lot of dark photos on this site so obviously many people like dark photographs. I'm always looking for that "bright, happy world" and that is what I'd like to convey with my images so I process that way. I don't mind the lighter spot (it is, after all, not a studio background) in your image but if it were my image I'd try to change the purple hue of the brighter part, although that might lighten up a bit if you were to increase the midtones. Processing is a matter of taste to some degree so if you are happy with the image then that is all that counts as long as you are not entering it in a competition of some sort, where processing then does matter a lot. I cannot process the image to show you what I might do since I cannot download it, apparently the moderators can do that.
Thank you for your recommandations; I can confirm that the image was taken in low light (finaly the metadata have come back with my last post!). Before going further, I used Topaz denoise to reduce the noise; you talk about the Auto button in LrC, something I didn't suspect but I will discover. In Costa Rica the challenge was the lack of light, especially with my D500 and high ISO; here in Quebec, the challenge is now taking good photos with snow and a lot of light coming with spring; it's our ''bright unhappy world'', lacking of colours which will come again later in May!
 
I like this photo taken last year in Costa Rica; the bird, a rufous-collared sparrow, seems to have a lot of confidence with what might make you think to a bow tie; but, the background is partly ruined by a kind of highlight; my main post-processing tool is Lightroom classic and I tried unsuccessfully to make a more uniform background with masks. May be you will have some suggestions to give me. Thank you in advance!
Take a look at 30 Days to Ps Mastery by Blake Rudis... excellent course and when you are done you might turn into a "Blake addict" like me. Blake is an amazing instructor and has some great courses you might not be able to resist.
 
Hi Christobal -before you buy any PS lessons - and I am not taking against anybody, check out Piximperfect. Unmesh has >5m followers on YouTube and is in my opinion is one of the best guys out there to teach you PS. I have watched Blake Rudis too for years, he is the color guru, but Unmesh is overall my faforite.
There is also Photoshop Training Channel, Jesus Ramirez is also awesome. All the guys have free tutorials on every aspect of PS.
Unmesh has a free beginners course on his web site and it covers everything you will need to understand the principles of the program.
I have used him as a "tutor" for years
 
Last edited:
Take a look at 30 Days to Ps Mastery by Blake Rudis... excellent course and when you are done you might turn into a "Blake addict" like me. Blake is an amazing instructor and has some great courses you might not be able to resist.
Thank you for your suggestion! I will take a look at Ps Mastery.
 
Hi Christobal -before you buy any PS lessons - and I am not taking against anybody, check out Piximperfect. Unmesh has >5m followers on YouTube and is in my opinion is one of the best guys out there to teach you PS. I have watched Blake Rudis too for years, he is the color guru, but Unmesh is overall my faforite.
There is also Photoshop Training Channel, Jesus Ramirez is also awesome. All the guys have free tutorials on every aspect of PS.
Unmesh has a free beginners course on his web site and it covers everything you will need to understand the principles of the program.
I have used him as a "tutor" for years
Hi Callie! Thank you so much! I take note of your two PS trainers; April is yet a good time of the year to improve my post processing knowledge before the spring migration of birds in May :)
 
I like this photo taken last year in Costa Rica; the bird, a rufous-collared sparrow, seems to have a lot of confidence with what might make you think to a bow tie; but, the background is partly ruined by a kind of highlight; my main post-processing tool is Lightroom classic and I tried unsuccessfully to make a more uniform background with masks. May be you will have some suggestions to give me. Thank you in advance!View attachment 85583
Add vignette?
 
I would not try to make the background uniform. That's just a difficult road to go down if that's always your goal, given how nature is not going to play ball with you that way.

Instead, I would mask the background completely and slightly reduce luminance and saturation (it's already soft so no need to do negative texture / sharpness), while at the same time slightly raising those same values for the subject. Making the bird POP with a difference in perceived light and color will do wonders to keep the eye from noticing what's behind, especially since there are no actual spectral highlights. Making those adjustments in small increments will keep it real.

Chris
 
Back
Top