Milky Way photos - stacking images - many questions

If you would like to post, you'll need to register. Note that if you have a BCG store account, you'll need a new, separate account here (we keep the two sites separate for security purposes).

This weekend I am hoping to get out and take some Milky Way shots and I am planning to stack the images using Sequator. I will be shooting with my Z6ii and the 20mm 1.8 and I don't have a star tracker. I am planning on keeping the exposures at 10 to 15 seconds to prevent the stars from trailing and I usually shoot the lens wide open. I have some questions for those of you who have tried this process. Is it better to keep the ISO down and brighten the image in post or raise the ISO and let the stacking process take care of the noise? How many images should I take for the stacking process? Does using a dark frame really help? What else should I do as I capture the images?
Just for fun, this is an image I took last year from a single shot.
Bodie 2-Edit.jpg
You can only see EXIF info for this image if you are logged in.
 
I’m sure someone here will likely have the answers to your questions but sometimes you need to try some different things yourself and evaluate the results. Sometimes for night pano’s I trial shoot a night or two before to iron out any bugs and give myself best chance of success.
Consider it as designing one or two experiments. Prepare what you require, shoot and separate images from next series. Evaluate the results.
 
In my experience it’s always better to expose properly from the beginning. Good lenses and sensors will make post processing easier since they have less errors and noise to begin with. I’ve had great success just running an image through topaz DeNoise vs stacking.
 
I agree that it is better to expose properly before post production.
With a 20mm lens, you can expose for up to 20 seconds without getting star trailing. Or use 15 seconds if you want to be sure of that.
At f1.8 and a 20 second exposure, I suspect you will be shooting at ISO 3200 - 6400 for best exposure.
Using a program like Topaz Denoise AI or Topaz Photo AI will greatly help eliminate noise in post production.
 
I am interested to see how this thread develops -- I have been observing the threads in DPR -- and hope that this community also develops an interest in Astrophotography.

I find Hudson Henry's work and guidance on YouTube and his own site on these types of shot very informative. His free download is also good value.

Generally when considering astro - I wonder what is the correct exposure - I do not accept that the best results can be obtained by "correctly exposing a single image unless one is using a tracking mount (like the Move Shoot Move star tracker kit B Hudson uses) - my research identified:

untracked_astrophotography - "Without mechanical tracking star trails can only be avoided by limiting the exposure time. The maximum exposure time depends on the focal length of the objective and the distance of the object from the northern star. An empirical rule for estimating the exposure time is the so called "500 Rule" (500 / (Crop-Factor x Focal Length) = Ideal Shutter Speed) (sometimes "600 Rule"). According to this rule the maximum exposure time that will not show star trails is calculated by dividing 500 (respectively 600) by the focal length of the objective. For a 20 mm lens on a full frame body this rule will give 25-30 seconds maximum exposure time." -- BUT the resolution of the sensor also matters -- when shooting "for example" a 45.7mp sensor -vs- a 24mp sensor - I would reduce the exposure to half of this time PER Exposure -- and this is the point why one takes multiple shots to "build" the exposure you need to be ideal and YES use stacking software to blend them together.

As in most photography it is better to have a sharp movement free image (or stack of such images that you combine later) that is underexposed rather than expose "correctly" and have movement blur (unless of course trails are what you are seeking).

Various trackers for use taking Milky Way and other astro shots - this is a good article on when and how to use trackers

One approach that Hudson uses for a shot like yours it to take a landscape shot of the foreground in the "Blue hour" and stack on an astro image in PS as a sky replacement.
 
Last edited:
NIce shot!

Is it better to keep the ISO down and brighten the image in post or raise the ISO and let the stacking process take care of the noise? How many images should I take for the stacking process? Does using a dark frame really help? What else should I do as I capture the images?
Just for fun, this is an image I took last year from a single shot.
Personally I try to shoot close to the correct exposure in the field. Sure most modern cameras are ISO invariant across a large range and you could also brighten them in post with roughly the same results but it's hard to compose and frame at night so shooting close to the correct exposure in the field lets you quickly check captured images to make sure it's pretty much what you wanted to capture. Similarly I tend to intentionally frame a bit wide, especially if you'll stack frames, to make sure you've captured enough even after any layer alignment and cropping of the final image.

I've shot dark frames, bias frames, etc. and gone through the process of using them in the final stacked image. It can be noticeable especially if your sensor has noticeable hot pixels but I haven't found it all that necessary for Milky Way shots as compared to things like deep space imaging where a single speckle of color can be very out of place. It only takes a couple of minutes to shoot some simple dark frames and then you can decide later whether it's worth the effort to incorporate them into the final stack but personally I rarely do that anymore.
 
That's a nice shot, Bob.

Stacking obviously helps with improving your signal to noise ratio (the more frames the better to an extent). A fairly standard and easy approach is to take as many short exposures as time/patience allows and do one (or a few) very long exposures for your foreground, ignoring star trailing in those. Stack the sky images, blend it together with your foreground and you'll have a very nice image to work with.

Using star trackers opens up different options, but for these wide angle Milky Way shots, it's absolutely not a requirement.
 
I imagine you've seen this article, but I found It interesting even if I can't give you personal experience.

 
You have a really nice image there. I'm impressed that you did that with a single exposure.

I have a similar kit to what you have: Nikon Z6 and Nikon Z 20mm 1.8 lens. This is what I found:

1. I use 8 second exposures at ISO 3600 for the Milky Way. (The exposure length is what PhotoPills advises me to do.)
2. I take about 10-12 "light" exposures and 5-8 "dark" (You have to experiment. Sometimes more "light" exposures help, sometimes they lead to more star trailing when using Sequator. Sometimes they create weird chromatic aberrations that turn stars into "raccoon eyes". Sometimes the "dark" exposures cause haloing. No rule seems to emerge in my limited experience.)
3. I expose for the foreground separately, often taking the image at dusk because I find it hard to see what I'm doing. (Moon lit nights work too if there's no water. I also found that the moon can be a little too directional sometimes.) I also expose the foreground separately because I often have trees in my images. The smearing is a pain to deal with. So, I often expose the foreground to keep the trees out of the image while making sure the Milky Way is where it's supposed to be.
4. In addition to Sequator, use StarNet++ to remove the star field so that you can process the Milky Way's nebulousity without making the stars huge and blown out.

merged affinity-jpeg.jpg
You can only see EXIF info for this image if you are logged in.
 
Last edited:
You have a really nice image there. I'm impressed that you did that with a single exposure.

I have a similar kit to what you have: Nikon Z6 and Nikon Z 20mm 1.8 lens. This is what I found:

1. I use 8 second exposures at ISO 3600 for the Milky Way. (The exposure length is what PhotoPills advises me to do.)
2. I take about 10-12 "light" exposures and 5-8 "dark" (You have to experiment. Sometimes more "light" exposures help, sometimes they lead to more star trailing when using Sequator. Sometimes they create weird chromatic aberrations that turn stars into "raccoon eyes". Sometimes the "dark" exposures cause haloing. No rule seems to emerge in my limited experience.)
3. I expose for the foreground separately, often taking the image at dusk because I find it hard to see what I'm doing. (Moon lit nights work too if there's no water. I also found that the moon can be a little too directional sometimes.) I also expose the foreground separately because I often have trees in my images. The smearing is a pain to deal with. So, I often expose the foreground to keep the trees out of the image while making sure the Milky Way is where it's supposed to be.
4. In addition to Sequator, use StarNet++ to remove the star field so that you can process the Milky Way's nebulousity without making the stars huge and blown out.

View attachment 59428
Can you tell me more about using multiple dark frames? I thought you only use one of those?
 
My camera of choice for night sky photography is my Nikon Z7 and and my preference is stacking shorter exposure time images due to the 45 MPixel sensor.

For what it's worth: I have picked up some really useful information on Richard Tatti's YouTube channel (https://www.youtube.com/channel/UC-KNiVo4X76cJIMphH1lEdA) and from his website (https://www.nightscapeimages.com.au/). He typically incorporates a foreground element(s) into his nightscape images and goes into quite a bit of detail regarding his various techniques both for capturing the foregrounds and for shooting clean night sky images.
 
Can you tell me more about using multiple dark frames? I thought you only use one of those?
You can use multiple: image frames, dark frames, bias frames, flat frames...

Basically any single image has some amount of random noise in addition to any systematic variation (e.g. hot photosites or biased photosites) if you average those calibration frames they also benefit from noise averaging in the same way the image frames benefit from noise averaging for the non-systemic noise issues.

IOW, a single dark frame may identify hot photosites but have some errors due to the random noise in any given exposure. Average a bunch of dark frame images all shot at: the same temperature, for the same time at the same ISO and they become more accurate dark frames with the random shot to shot noise reduced in proportion to the number of dark images you stack into an average dark frame. Same basic idea applies to other types of calibration frames and of course the image frames themselves.
 
Can you tell me more about using multiple dark frames? I thought you only use one of those?
You can take as many as you like. I think astrophotographers take about 12-15 of those. I haven't seen much value in that and in fact as I said earlier I have seen instances when the dark frames create haloing. In those cases, I don't use them. Basically, what I do is run Sequator with a different combination of light and dark frames to get a single image of what I think looks acceptable.

BTW, if you use Sequator, you will be limited to light and dark frames. Sequator doesn't use bias and flat frames despite the fact that they serve an important role in astrophotography.

Like BrianMM, I recommend that you check out Richard Tatti's YouTube channel (https://www.youtube.com/channel/UC-KNiVo4X76cJIMphH1lEdA) as he provides the most comprehensive workflow for creating a landscape Milky Way photo. If you want more, check out Nico Carver's YouTube channel and Alyn Wallace's.
 
  • Like
Reactions: tc1
I imagine you've seen this article, but I found It interesting even if I can't give you personal experience.

That was a very helpful article. Thank you.
 
You can use multiple: image frames, dark frames, bias frames, flat frames...

Basically any single image has some amount of random noise in addition to any systematic variation (e.g. hot photosites or biased photosites) if you average those calibration frames they also benefit from noise averaging in the same way the image frames benefit from noise averaging for the non-systemic noise issues.

IOW, a single dark frame may identify hot photosites but have some errors due to the random noise in any given exposure. Average a bunch of dark frame images all shot at: the same temperature, for the same time at the same ISO and they become more accurate dark frames with the random shot to shot noise reduced in proportion to the number of dark images you stack into an average dark frame. Same basic idea applies to other types of calibration frames and of course the image frames themselves.
Thanks for the explanation of the need for multiple dark frames, very helpful.
 
NIce shot!


Personally I try to shoot close to the correct exposure in the field. Sure most modern cameras are ISO invariant across a large range and you could also brighten them in post with roughly the same results but it's hard to compose and frame at night so shooting close to the correct exposure in the field lets you quickly check captured images to make sure it's pretty much what you wanted to capture. Similarly I tend to intentionally frame a bit wide, especially if you'll stack frames, to make sure you've captured enough even after any layer alignment and cropping of the final image.

I've shot dark frames, bias frames, etc. and gone through the process of using them in the final stacked image. It can be noticeable especially if your sensor has noticeable hot pixels but I haven't found it all that necessary for Milky Way shots as compared to things like deep space imaging where a single speckle of color can be very out of place. It only takes a couple of minutes to shoot some simple dark frames and then you can decide later whether it's worth the effort to incorporate them into the final stack but personally I rarely do that anymore.
Thanks for the feedback. Your comment on framing wide is so true. I have often found that after processing an image, especially stacks and panoramas, I often wish I had gone a little wider.
 
I’m sure someone here will likely have the answers to your questions but sometimes you need to try some different things yourself and evaluate the results. Sometimes for night pano’s I trial shoot a night or two before to iron out any bugs and give myself best chance of success.
Consider it as designing one or two experiments. Prepare what you require, shoot and separate images from next series. Evaluate the results

Thanks Steve, I do plan to do some experimenting. I wanted the get the "wisdom of the crowd" to help me think through some of the ideas.
 
I have not stacked images with Sequator, so I can't speak specifically to that program, but I do shoot milky way stacks with the Z6/9 and 20 1.8 S, and that lens and camera combo is a beast. If you edit on a Mac, I highly recommend the program "Starry Landscape Stacker" - it does a fantastic job with aligning, masking, and combining images and cuts out a lot of overlaying and other work in photoshop. It's $40, which certainly isn't cheap, especially for a program with a single purpose, but to me, its worth it.

Here's an image that I took at Grand Prismatic Spring a couple years back with the Z6 and 20 1.8.
GrandPrisMW.jpg
You can only see EXIF info for this image if you are logged in.
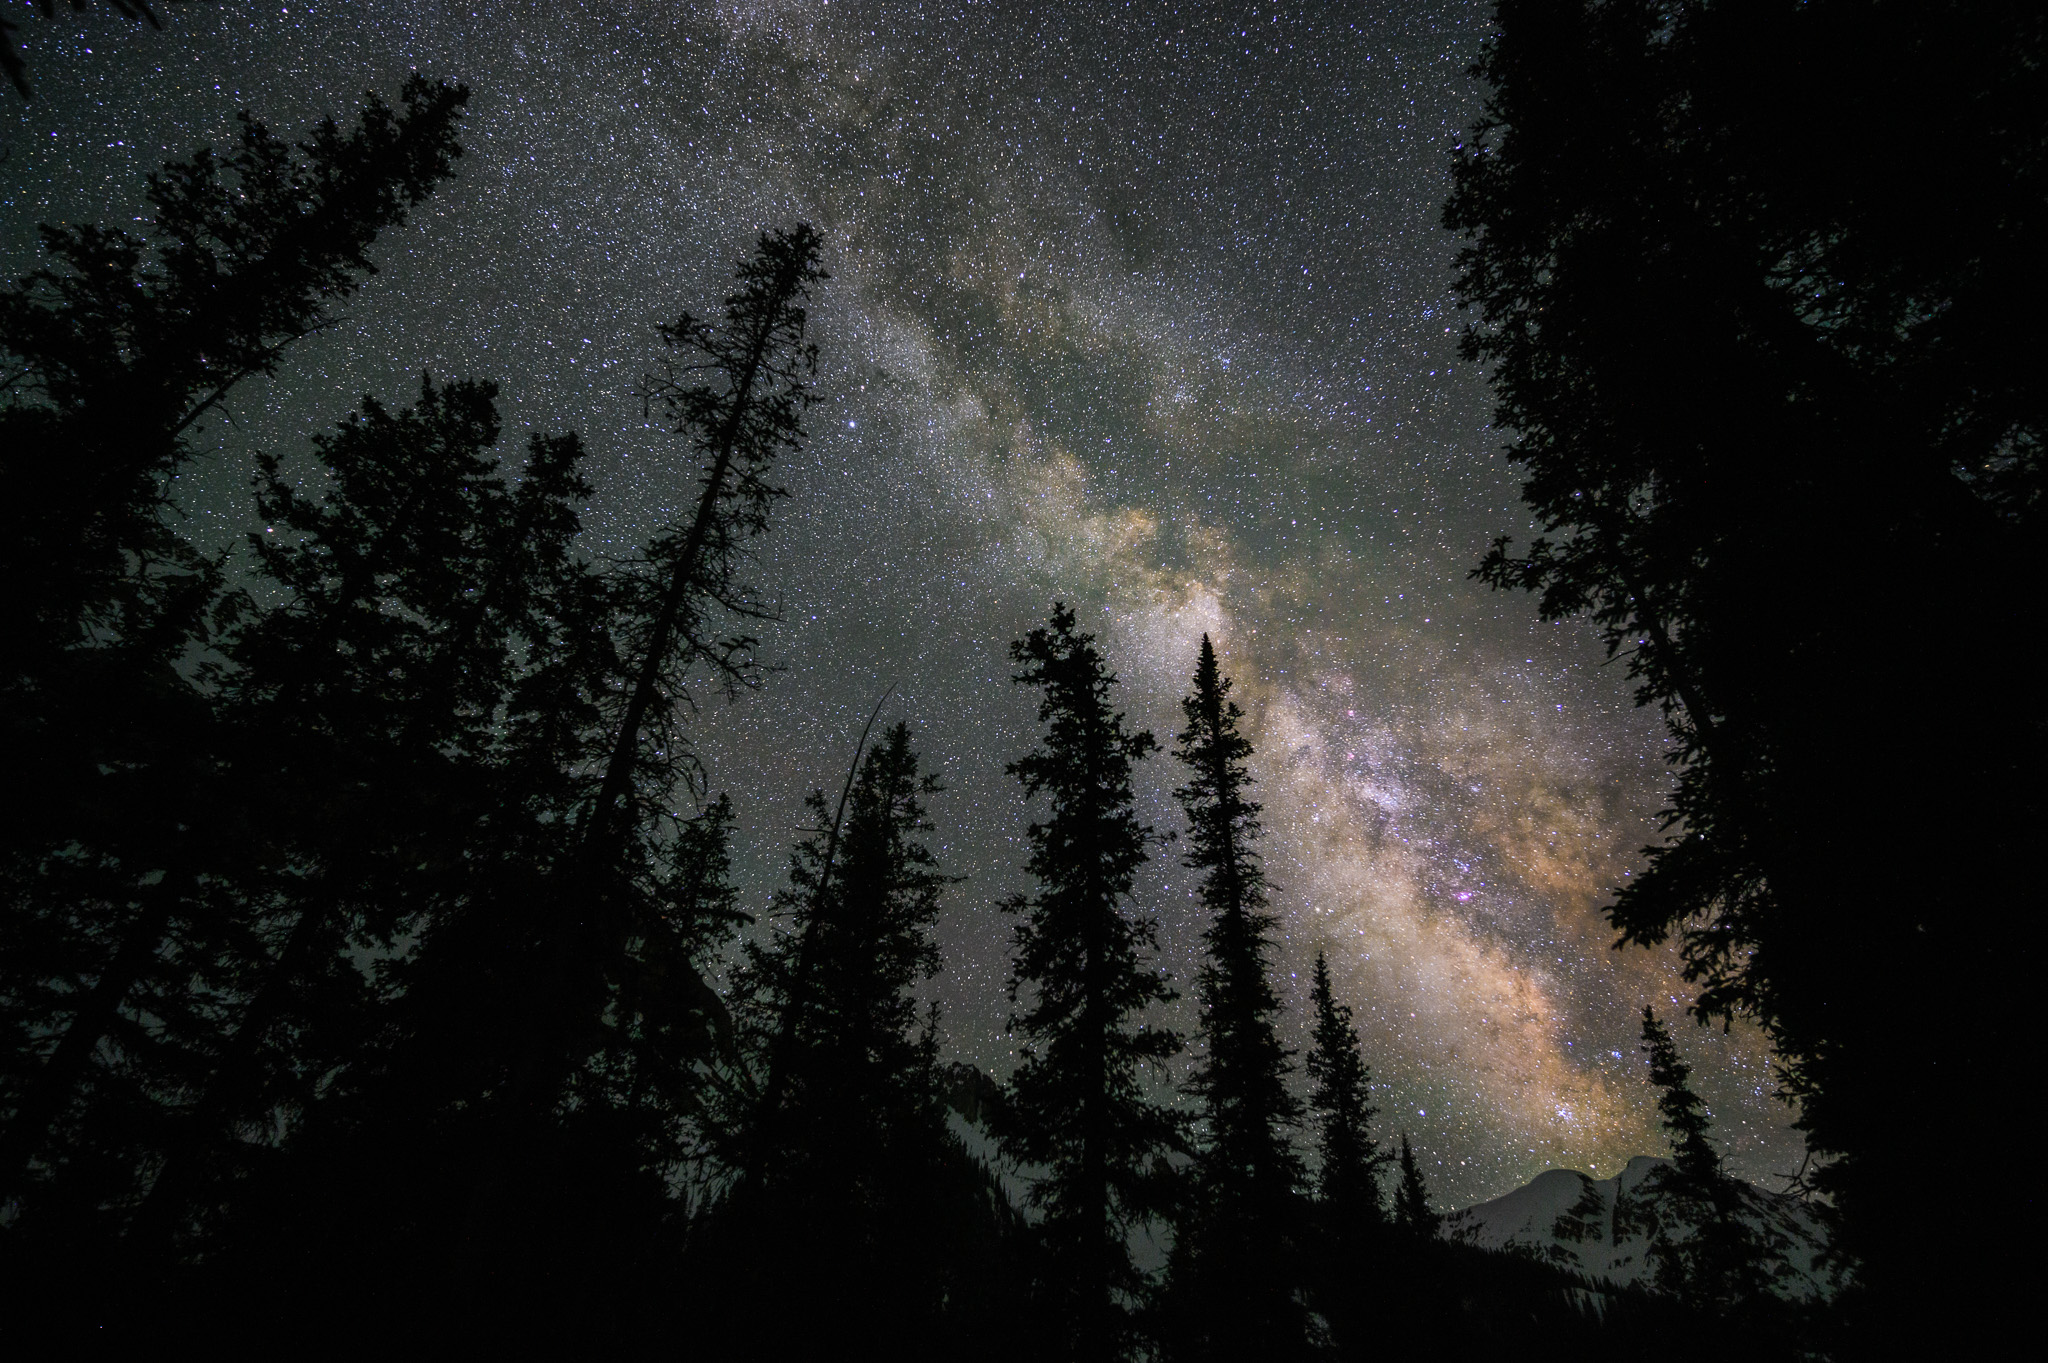

My go to settings, which I used for this image, are to shoot 15 second sub-exposures at F2.2 (I find the lens really shines when you stop down just a bit) at ISO 6400. Usually I'll shoot between 10 and 20 sub-exposures that will later get stacked, and I do the same amount of dark frames. For darks, it is important to do them in the same conditions (air temp) as your light frames so that the sensor noise is about the same - for me, I'll let those shoot while I'm packing up or moving locations or whatnot. I don't always, but some times I'll take bias frames at the fastest shutter speed the camera has, usually 20 or so. (I find bias to be less important for widefield with dslr/mirrorless cameras than they are for deep space imagery with dedicated astro cameras).

Once all that is done in the field, Starry Landscape Stacker makes it very easy, I just tell it which are the lights, the darks, the biases and let it rip. It'll have a few things for me to do, like clean up the mask between sky and landscape, but super simple and leaves me with very nice clean images for final processing in Photoshop.
 
I have not stacked images with Sequator, so I can't speak specifically to that program, but I do shoot milky way stacks with the Z6/9 and 20 1.8 S, and that lens and camera combo is a beast. If you edit on a Mac, I highly recommend the program "Starry Landscape Stacker" - it does a fantastic job with aligning, masking, and combining images and cuts out a lot of overlaying and other work in photoshop. It's $40, which certainly isn't cheap, especially for a program with a single purpose, but to me, its worth it.

Here's an image that I took at Grand Prismatic Spring a couple years back with the Z6 and 20 1.8.
View attachment 59475

My go to settings, which I used for this image, are to shoot 15 second sub-exposures at F2.2 (I find the lens really shines when you stop down just a bit) at ISO 6400. Usually I'll shoot between 10 and 20 sub-exposures that will later get stacked, and I do the same amount of dark frames. For darks, it is important to do them in the same conditions (air temp) as your light frames so that the sensor noise is about the same - for me, I'll let those shoot while I'm packing up or moving locations or whatnot. I don't always, but some times I'll take bias frames at the fastest shutter speed the camera has, usually 20 or so. (I find bias to be less important for widefield with dslr/mirrorless cameras than they are for deep space imagery with dedicated astro cameras).

Once all that is done in the field, Starry Landscape Stacker makes it very easy, I just tell it which are the lights, the darks, the biases and let it rip. It'll have a few things for me to do, like clean up the mask between sky and landscape, but super simple and leaves me with very nice clean images for final processing in Photoshop.
Thanks Justin, that is a great composition with a super clean execution! I edit on a PC so Sequator is what I will be using. I like your shooting plan and I will see how well I can implement it. We are heading to Joshua Tree so there will be interesting landscapes to include and light pollution to battle .
A question for you on the 20 mm, I sometimes struggle to fine tune the focus when manually focusing. The electronic focusing of this lens seems to make manual focusing more difficult than the older lens I have used that have a mechanical connection for focusing. Do you have any suggestions?
Thanks again for the clear description on how you capture the images for stacking.
Astrophotography is typically done using manual focus. Watch the whole thing but the most important part starts at around 5:15. Once I get focus, I use masking tape to "lock" the focus ring.

 
Astrophotography is typically done using manual focus. Watch the whole thing but the most important part starts at around 5:15. Once I get focus, I use masking tape to "lock" the focus ring.

Thank you this was a very helpful video. The issue I am dealing with is specific to the new Z lens which do not have mechanic connections between the focus ring and the lens. I find them some what more difficult to focus them manually when compared to the older f mount lens with their mechanical linkage.
 
Thank you this was a very helpful video. The issue I am dealing with is specific to the new Z lens which do not have mechanic connections between the focus ring and the lens. I find them some what more difficult to focus them manually when compared to the older f mount lens with their mechanical linkage.
I have the same lens and nearly the same body you use (yours-Nikon Z6 II; mine-Nikon Z6). Unless your Z6 II is significantly different than my Z6 I, the Nikon Z 20mm f/1.8 should work fine.
 
Status
This thread has been closed due to inactivity. You can create a new thread to discuss this topic.
Back
Top