photo suggestions needed

If you would like to post, you'll need to register. Note that if you have a BCG store account, you'll need a new, separate account here (we keep the two sites separate for security purposes).

Hi everybody

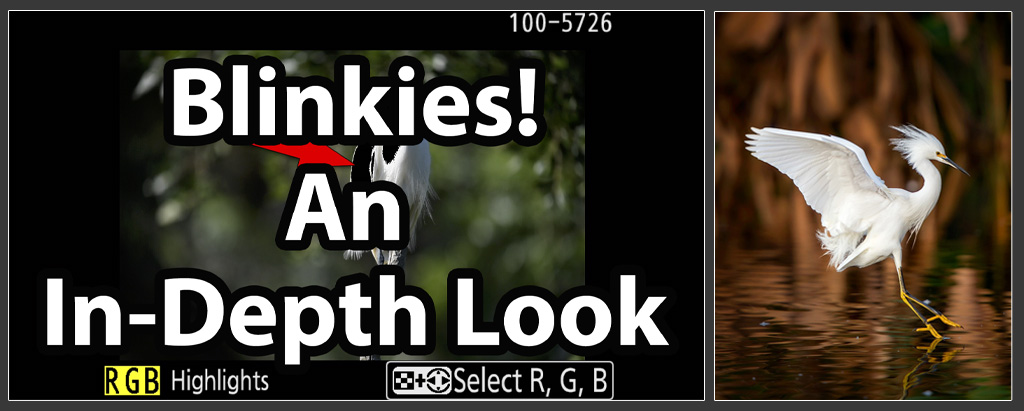
this pic has been taken today in bright daylight around noon, with the sun high in the sky with these settings

F5.6 1/3200 iso 900 spot metering

How can I avoid to burn the white/pale parts of the bird? Do I have to underexpose a little or what else?

this is the pic:

Thanks a lot
Alex Boldrini
 
Agree. You probably missed the spot. Either use matrix/evaluative or if using spot get a good reading on something middle toned and lock exposure. Could turn on blinkies if you have them to warn you of blown highlights.
 
sorry I took a better look at the photo info and it was matrix, not spot metering. So could the problem be solved by dialing down exposure compensation?

It would in this case, but you want a predictable way to judge it. Either experience or watching the blinkies or the histogram.
 
I’m not sure what camera you are using. Like others have said I wouldn’t use spot meter but more of a full meter mode that’s evaluating the whole screen. I would also drop the exposure 1 stop or so. If you have a mirrorless camera that has zebras you will see the over exposure in real time and use an exposure compensation dial to adjust on the fly.
 
As has been said, in those conditions turn exposure compensation down. If you are using a mirrorless camera you can see the result before you take the shot. If you don't have a mirrorless camera, you are probably looking at between minus 1-2 stops.
 
Thanks dtibbals. Unfortunately not. My gear is: Nikon D500 + Nikkor 200-500mm f.5.6

Shot taken at 500mm
I shoot that same combination. First, white bird against dark background is not an easy exposure. Like others have said, I usually use Matrix metering. I have the PV button configured to turn on spot metering when it is pressed. I find spot metering on a moving bird that is not taking up a huge amount of the sensor is hit or miss at best.

My rule of thumb if the subject is a lot lighter than the background and in direct sunlight, I start with -.7ev. If highlights are washed out I'll go to -1.3ev. In a case like this I would rather be a little under exposed and boost in post processing than be overexposed.

Likewise, if I'm taking photos of a snow scene I go +.3 or so to be sure the snow is white not gray.

@Steve covers a lot of this in his book "Secrets To Exposure And Metering For Nikon". The book is a good investment.

Jeff
 
If this is something you shoot often you might want to try using center weighted metering. A bit more forgiving than spot metering as the Circle that it reads is larger but doesn't read the entire image.

Another option with a D500 is to use highlight weighted metering which would prevent the whites of the subject from getting blown out. You do wind up with a pretty dark image overall which usually requires some post possessing but at least you won't lose all the feather details.

You of course can dial in some negative exposure compensation but how much becomes a bit of trial and error.
 
Thanks dtibbals. Unfortunately not. My gear is: Nikon D500 + Nikkor 200-500mm f.5.6

Shot taken at 500mm

I think you have blinkies in that camera. If I understand right you would turn on highlights in the playback menu. In that scenario you'd take a test shot and see if anything is showing overexposure. Similarly you could peek at the histogram and if it is climbing the right wall then back off a touch. Take another test shot to confirm. Then hold at that exposure unless clouds roll in front of the sun or the bird flies into shadows (doesn't matter if it flies in front of shadows, as long as the light hitting the bird is the same). You hold exposure with exposure lock or by shooting full manual.
 
Last edited:
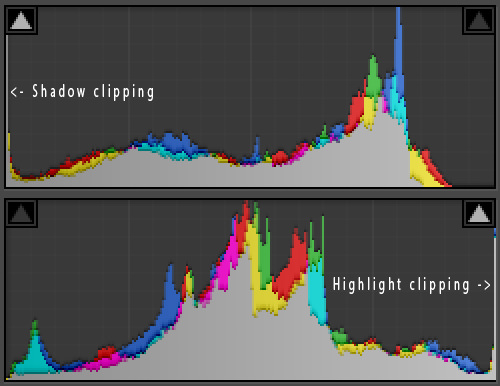
Thanks a lot guys, you've been very helpful . Another question. Since I'm a beginner , Could you help me read the istogram? What does it mean when it peaks on the right , in the middle or in the left of it?
 
Thanks a lot guys, you've been very helpful . Another question. Since I'm a beginner , Could you help me read the istogram? What does it mean when it peaks on the right , in the middle or in the left of it?

There is no 'correct' histogram. To learn try taking a series of test photos starting normal and exposing more and more until you are overexposed on purpose. Look at the histogram in playback and watch the rightmost edge how it approaches the right edge then climbs up the right edge. This is showing more and more pixels are so bright they don't have any detail. The top of the head of the bird you posted probably is like that. Some people like to get right up to the edge without going over, others try to make sure they have a little room just in case unless it is something they don't care about having detail, like a glint off of water for example.

Blinkies are better because they show what part of the picture is blown out. The histogram climbing the right just tells you there are blown pixels somewhere but you have to figure out if they are a part of the image you care about having detail.


Last edited:
Thanks a lot guys, you've been very helpful . Another question. Since I'm a beginner , Could you help me read the istogram? What does it mean when it peaks on the right , in the middle or in the left of it?
at a very basic level, left is dark, right is bright. If you have peaks at either extreme you are underexposed (left) or overexposed (right). Well, it is more complicated than that. Peaks at left or right extreme mean some part of your image is over or under exposed but you may want something like that (example black out background on a flower photo) which would show high peaks on the left. It is just a guide to give you a visual representation of the overall spectrum of light and dark your camera saw.
I do recommend @Steve 's understanding exposure book above. He goes into some much better explanation of the histogram, exposure modes and how to think through the exposure for your image. It is money well spent and his books are very reasonable. They are in PDF format for you to download and read at your leisure and to use for reference in the future
 
When I'm shooting white birds, or dark birds with a lot of white, I'm immediately thinking about the risk of burning out the highlights. Depending on conditions, I might dial in -.3 or -.7 compensation to start (from matrix metering), check the histogram and blinkies, and adjust from there.

My goal is NO burned out whites. I might accept burned out specular highlights on water, but never anything larger or on the subject itself. If I have to adjust compensation down to the point where I'm losing the shadows, I do it. Our eyes are used to not seeing into dark shadows, but burned out solid whites are obvious.

I still miss this at times. As good as modern metering systems are, they have no idea what you're pointing the camera at and will try to turn everything into a mid-gray tone. In the case of snow I've sometimes gone as low as -2.0.
 
For this kind of subject I normally avoid any kind of automated exposure. The light on the subject is constant - in full sun or near full sun - so the correct exposure won't change. It's very close to Sunny 16 for every shot. In this case the relatively dark background is making the camera "add more light to the exposure" using a higher ISO, slower shutter speed, or wider aperture depending on your Exposure Mode. The camera is considering the background and the subject when it judges exposure, but the background is dark and the camera is trying to make it neutral. That overexposes the subject as in your image. Your image is at least a 1-1.5 stops overexposed. While exposure compensation might work, a half second later when you have bright sky behind the bird, it will be underexposed.

Matrix metering, spot metering and center weighted metering are all useful, but in this case you will be constantly chasing adjustments to exposure that vary depending on the brightness of your subject, the size of the subject in the frame, and the background. They are useful for test exposures to quickly assess the lighting on your subject and what exposure is the brightest without blown highlights. But once you know the correct exposure, you can lock it in using manual mode and it will be correct for every succeeding image.

This won't work as well if light is changing constantly, and in that scenario an automated metering approach with a little Exposure Comp could be used. If you still have changing backgrounds, the best solution is to narrow the shooting window so backgrounds and framing remain within a narrow exposure range. You won't be able to change Exposure Comp during a single pass of each flying bird.

Comparison - Manual Exposure.jpg
You can only see EXIF info for this image if you are logged in.
 
Hi everybody

this pic has been taken today in bright daylight around noon, with the sun high in the sky with these settings

F5.6 1/3200 iso 900 spot metering

How can I avoid to burn the white/pale parts of the bird? Do I have to underexpose a little or what else?

this is the pic:

Thanks a lot
Alex Boldrini
I shot the same combination. I shoot manual and use my meter instead of exposure compensation. If I have a high contrast shot like yours I under expose a stop. Chimp and use the info for the rest of the same conditions. I personally see no value in exposure compensation because I normally shoot manuel. Depending on conditions with or without auto ISO. My fingers have gotten good memory of the buttons and I don't even have to remove the camera from my eye to change ISO or auto ISO settings. That is my preference. Others have ways that work better for them. I also have my PV button set for single point focus afc my joystick set for group and my af set for area. So it's fast to change focus modes on the fly.
 
I shot the same combination. I shoot manual and use my meter instead of exposure compensation. If I have a high contrast shot like yours I under expose a stop. Chimp and use the info for the rest of the same conditions. I personally see no value in exposure compensation because I normally shoot manuel. Depending on conditions with or without auto ISO. My fingers have gotten good memory of the buttons and I don't even have to remove the camera from my eye to change ISO or auto ISO settings. That is my preference. Others have ways that work better for them. I also have my PV button set for single point focus afc my joystick set for group and my af set for area. So it's fast to change focus modes on the fly.
I get what you're saying generally but a little confused and because I like the idea of using the exposure meter and under or over exposing to fit the situation, perhaps you can explain a little more. If I'm fully manual with auto ISO when I change my exposure by use of the SS or aperture, the auto ISO is going to correct back to the wrong exposure, while if I use exposure compensation that will not happen. So, I think you're saying in those conditions you turn off auto ISO and set it manually as well. Is that correct? Currently I'm in manual with auto ISO and when I get to a site and know what I'll be shooting, ie light target against dark background or vice versa, I'll make a series of test shots sighting on an object of approximately the same ev as my anticipated subject and adjust exposure compensation to get the correct exposure. Once there, as conditions change, I can adjust the exposure compensation, and with practice I'm now usually quite close. If conditions change substantially through the day I just re-test. Sounds like your system may be faster. So, if you're in complete manual mode, are you using auto ISO or turning it off when you use the meter to compensate? Thanks
 
I typically use spot metering but I meter off something that is medium grey, and lock exposure. If you use matrix metering, you'll need to underexpose with either EX.Comp, stop down, or faster shutter... The other option open to you on a D500 is highlight weighted meter, which will protect your highlights more. It's the meter mode that looks like "spot" with an Asterix above and to the right of it. I use that quite a bit on white birds. It tends to make your background dark though so you want to be careful that is the look you're going for.

All in all, I never really go wrong with "spot meter for medium grey and shoot away"... You just have to be aware when the light changes drastically.

Normally I have my camera set to Matrix metering, manual exposure with auto ISO while driving around since the light is changing quickly in that situation and I want to be ready if something happens right by the vehicle... When I get out of the truck I use my PV button (which I set to spot meter), meter for medium grey, and lock the exposure. Works for me...

Whatever you do, just looking at your image, it appears that you were in a situation where the light was pretty constant and quite bright. You'll need to make sure that you pay attention to that and have your exposure set to compensate best you can while you're out walking around. With Manuel and auto ISO you will generally be CLOSE to correct but not always and you can find yourself "chasing your exposure" around as the auto ISO keeps changing whatever you try to input, etc... When you think about it, medium grey is medium grey in the image you posted. If you had exposed for medium grey and locked it in, then you really dont have to think about it much more from there, unless a cloud bank rolls in our something...

Really there are a whole bunch of ways to "skin a cat" so to speak, it really boils down to what you're trying to accomplish artistically with the shot.

There are lots of resources on exposure, Steve's are honestly some of the BEST (hopefully you bought his e-book on exposure modes). Here is a YouTube video that is helpful as well. Its specifically about exposure in snow, but the concept is the same:
 
Last edited:
If I'm fully manual with auto ISO.... So, if you're in complete manual mode, are you using auto ISO ...

Sorry to interject in your question to another poster, but perhaps this will help... If you are using "auto ISO" you aren't really using a "fully manual" exposure mode because you've allowed the camera to make the ISO decision for you. Fully manual would mean you take control of all three controls in the exposure triangle... It might sound complicated, but it really isn't. For most situations, you want to shoot an ISO as low as you can get while still giving yourself the highest shutter speed flexibility. I find and ISO of 200-800 on a D850 (or when I had a D500) will work fine... Also, I think most people like as smooth a background as they can get, so they are usually shooting pretty close to wide open... So ISO and Aperture are usually pretty close to constant for large portions of a shoot.

You are correct when you say that the program mode of using "manual with auto ISO" (again its not full manual, its a kind of program mode) can leave you chasing your exposure because ISO keeps shifting, especially in Matrix mode because every time your background changes your exposure changes with it... EC can compensate for this but it's still fiddly at times. It does get you CLOSE though as long as you've set your upper ISO limit to something you're happy to live with. Personally I like the method of spot metering for medium grey and locking exposure. That way your exposure doesn't really change when your background does (and most of the time it SHOULDN'T when you think about it, if its dark its dark and thats the way the scene is). With a true fully manual exposure you do have to be aware when the light changes dramatically though.

In the OP's original image it looks like what happened is that the Matrix meter made the dark background medium grey and when it did that it over-exposed the whites. Metering for medium grey in full Manuel would have fixed that problem for him and left the background dark with the bird white, which is what he was hoping for. Highlight weighted metering might have also fixed it.
I’m definitely going to try what you and Eric suggest. I can think of numerous times this would have worked very well. Thanks
 
I’m definitely going to try what you and Eric suggest. I can think of numerous times this would have worked very well. Thanks
I think you might like it. At a minimum you will likely learn a lot about exposure buy learning to identify what "medium grey" is... I know it helped me a lot.

A couple of side notes:
1. Its great practice to think in terms of Black and white images while you're walking around, then meter off those items you think are medium grey, and check the exposure to see if you guessed correctly. DO that and it won't take long to figure out what you're looking for.
2. If you can't find something that is medium grey to meter off of all you really need is a frame full of a constant tonality. You can meter off of pure black or pure white for instance, just as easily as medium grey provided you understand what your camera is trying to do with those tones. (it will ADD light to the darks and SUBTRACT light from the whites to make each one GREY). Just over or under expose them to achieve grey.
3. If you want to do something creative with a certain image and you've locked in a correct exposure (but say you want some wing blur on a panning shot of a flying bird you need to slow your shutter speed) just remember that any correction you make (like slowing a shutter speed) is easily countered by making the SAME adjustment in the opposite direction on a different control (in the flying bird pano case you increase ISO or Aperture to compensate for the increased light added by the slower shutter). Nikon cameras work in 1/3 stop increments (I think Canon might be 1/4, but not sure) so three clicks slower shutter and three clicks higher ISO or stopped down aperture will produce the same exposure as you started with.
4. On a bright sunny day exposure is pretty easy. A blue sky is medium grey. Meter off of that and you'll be good until the light changes.

I don't know if that helps or not, but it helps me.
 
Last edited:
Back
Top