
true but a quality part won't do that.But you have to watch Stainless Steel now. I've had stainless bolts from China gall and Seize on the First Use and break the bolt during removal. "It's always something" Gilda Radner
You are using an out of date browser. It may not display this or other websites correctly.
You should upgrade or use an alternative browser.
You should upgrade or use an alternative browser.
Camera straps
- Thread starter bkashner
- Start date
If you would like to post, you'll need to register. Note that if you have a BCG store account, you'll need a new, separate account here (we keep the two sites separate for security purposes).
If you choose to use stainless steel there is anti-galling compound that is effective in preventing this from occurring.But you have to watch Stainless Steel now. I've had stainless bolts from China gall and Seize on the First Use and break the bolt during removal. "It's always something" Gilda Radner
Mal Paso
Well-known member
Thanks guys! I'll check it out this weekend! I should be retired but the work keeps rolling in and I have one more work day this week. I can't complain about the work site, 200 feet above a private beach in Big Sur. A Condor flew over two days ago and had a vulture tailing hoping for leftovers. Brought the 500 today but nothing to shoot.
I hope you do get to retire. At least it sounds like your view is good.Thanks guys! I'll check it out this weekend! I should be retired but the work keeps rolling in and I have one more work day this week. I can't complain about the work site, 200 feet above a private beach in Big Sur. A Condor flew over two days ago and had a vulture tailing hoping for leftovers. Brought the 500 today but nothing to shoot.
Mal Paso
Well-known member
Ya, but how do you know? Price isn't an indicator. There is as much counterfeit as real. I suppose McMaster-Carr may be a good source but Home Depot, Forget It!true but a quality part won't do that.
Mal Paso
Well-known member
I have some high dollar Nickel Antiseize. I'll retorque my Cummins manifold and if the bolts are still tight I'll use it. I worry about adding lubricity and having the bolt back out but maybe it doesn't do that.If you choose to use stainless steel there is anti-galling compound that is effective in preventing this from occurring.
I did my first one with the SS rivet nuts about 7 years ago and the second one 5 years ago. Both have been carried extensively in all kinds of weather summer and winter and I've not had any of the studs seize up or become corroded in there. I also have some good anti-seize that I use on other items (Breech plugs on antique rifles mainly) but for attaching ARCA plates to the foot of my camera lenses I haven't used it. I noticed you said something about Big Sur so living close to the ocean there may be more corrosive salt in your environment than I have here in Kentucky (well, have you seen the amount of salt they dump on the roads here when it snows...I have some high dollar Nickel Antiseize. I'll retorque my Cummins manifold and if the bolts are still tight I'll use it. I worry about adding lubricity and having the bolt back out but maybe it doesn't do that.
") ).
). Not sure I'd want any kind of oil to get on the lens though, if anti seize got on the glass I think it would be a mess to clean off.
Hope all works for you. Sounds like you have a lot of experience around tools and in the shop so this should be pretty straight forward regardless of which method you choose.
Oh, one thing I forgot, if you don't have a drill press vice, clamp the foot to a block of wood and your drill press table. The cast aluminum really wants to grab when the bit breaks through. If you're hand holding the part, it may go flying across your shop (or worse, come back and hit you). The first one I did, I clamped it in a padded jawed vice and drilled with a hand drill. The bit bound up some coming through but I was able to hit reverse and then go back on it to finish the hole. The second foot I did, I clamped it in my drill press vice and no problems at all. I forgot to mention that in the original post.
Best wishes for you regardless of which method you decide upon. Let us know what you end up doing.
Jeff
Fiat
Active member
Take the chance to ask here: I just received a new Z600 PF to work with my Z8. I think I need a good foot plate to place on the collar for two purposes: 1. as a longer handle to hand carry, and 2. so I can use a Black Rapid strap (hook to the lens). Which brand and model do you recommend? Thanks in advance.
Mal Paso
Well-known member
Thanks! I have a Mini Mill with Vise, DRO and Drill Chuck. Not great for steel but aluminum, no problem.I did my first one with the SS rivet nuts about 7 years ago and the second one 5 years ago. Both have been carried extensively in all kinds of weather summer and winter and I've not had any of the studs seize up or become corroded in there. I also have some good anti-seize that I use on other items (Breech plugs on antique rifles mainly) but for attaching ARCA plates to the foot of my camera lenses I haven't used it. I noticed you said something about Big Sur so living close to the ocean there may be more corrosive salt in your environment than I have here in Kentucky (well, have you seen the amount of salt they dump on the roads here when it snows...
Not sure I'd want any kind of oil to get on the lens though, if anti seize got on the glass I think it would be a mess to clean off.
Hope all works for you. Sounds like you have a lot of experience around tools and in the shop so this should be pretty straight forward regardless of which method you choose.
Oh, one thing I forgot, if you don't have a drill press vice, clamp the foot to a block of wood and your drill press table. The cast aluminum really wants to grab when the bit breaks through. If you're hand holding the part, it may go flying across your shop (or worse, come back and hit you). The first one I did, I clamped it in a padded jawed vice and drilled with a hand drill. The bit bound up some coming through but I was able to hit reverse and then go back on it to finish the hole. The second foot I did, I clamped it in my drill press vice and no problems at all. I forgot to mention that in the original post.
Best wishes for you regardless of which method you decide upon. Let us know what you end up doing.
Jeff
Look at the photo. There are protusions on both sides.not if the flange is put on the part of the foot that is between the lens and foot (bottom / top depending on which way you're looking at it. The part that goes where the Arca Swiss attachment would be is flush with no flange protruding. I've used them on a couple lens feet and zero problems.
The only thing holding your "rivet nut" in place is epoxy?If you decide to drill and tap the foot, please use one of these instead:
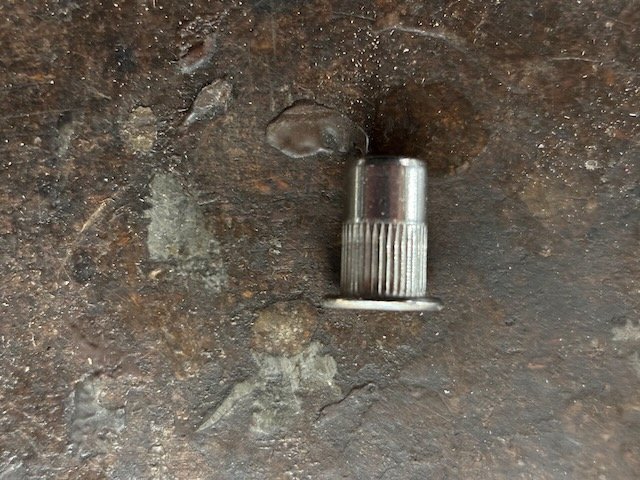
Rivet Nut
This is a pack of 30 but I'm sure you can find just one or two at any local hardware store. They are fairly common things.
The lens foot is made of cast aluminum and is very soft and "crumbly". Even if you manage to get it threaded 1/4X20, I would never trust it to hold a screw.
I did this on a Sigma lens foot and the lens foot on my Nikon 200-500. Drill the appropriate size hole for the outside diameter of the rivet nut. I think it was 5/16 but can't remember, a caliper or ruler will tell you.
Test fit the thickness since you may have to file a little off as the rivet nut may be longer than the thickness of the foot. It was that way with the Sigma lens but on the Nikon lens it was fine. Do this before gluing it in if you can otherwise you will probably scratch the lens foot when you file it already installed.
I then mixed up some epoxy, applied the epoxy to the nut and inserted it into the hole drilled. If you notice, the rivet nut has a wider flat area, that goes between the lens foot and the lens (or opposite the direction where force will be applied).
Once the epoxy cured and everything was set, I used a little black paint to blend everything together. Honestly, it looks just like the factory tripod mount hole when all done,.
This is the type of use these things are made for (well that and wood working where you want to bolt things like shelves etc.). Bottom line, these work very well where trying to thread cast aluminum will not work well.
Hope this helps.
no, the flange on the "off side" keeps it from pulling through. The knurls on it combined with JB Weld and a tight fit make it part of the foot. One would have to break the foot to get it out. The flange area goes opposite where the pulling forces are going to be. No way to pull hard enough to get that through. The epoxy is just to keep it from falling out the opposite direction. None of the weight of the camera or tension from the screw threads are being held by epoxy. Also, JB Weld bonds to the grain structure of the cast aluminum and knurled finish on the rivet nuts VERY well and has about a 500 degree heat tolerance.The only thing holding your "rivet nut" in place is epoxy?
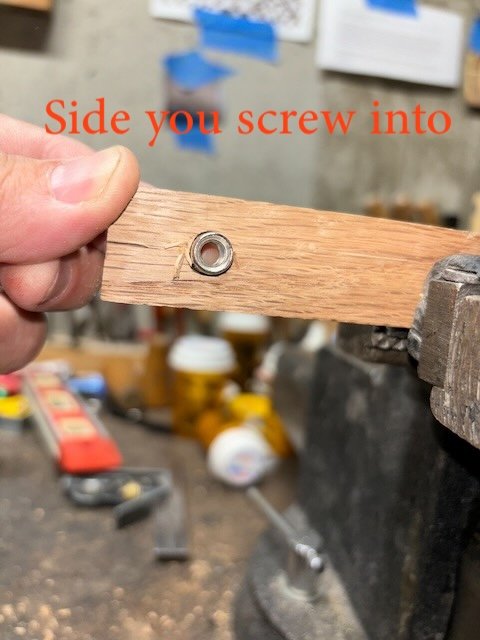
The ones I use have a flange only on one side. Here are photos of the ones I use. I drilled a hole in a piece of scrap wood just for an example on how I install them.Look at the photo. There are protusions on both sides.
The tighter you screw it down, the tighter the insert becomes against the lens foot. Epoxy just keeps things from spinning or pushing out when there is no tension.
Hope this helps.
You can only see EXIF info for this image if you are logged in.
You can only see EXIF info for this image if you are logged in.
Attachments
You are using incorrectly and risking chance of failure. The screw that threads into the nut should go in from the end with the small flange. The rivet nut is meant to be installed in hole, then crimped in place with a special tool. Your direction of pull is backwards.

You can only see EXIF info for this image if you are logged in.
They work like a expanding drywall anchor.OK gotcha.You are using incorrectly and risking chance of failure. The screw that threads into the nut should go in from the end with the small flange. The rivet nut is meant to be installed in hole, then crimped in place with a special tool. Your direction of pull is backwards.
View attachment 90377They work like a expanding drywall anchor.
However, how can it possibly be pulled through the thick metal on the foot? The application I'm using the flange acts as a washer on one side of the lens foot, the arca plate acts as a big washer on the other side and the rivet nut simply becomes a "nut" in the middle allowing the lens foot to be sandwiched between the two washers.
I don't see how either of them could pull through that much thickness of aluminum. On a sheet steel like your example, yes, but that's not really how I was using it.
As with any improvised solution, everyone's milage may vary.
Jeff
Last edited:
Used backwards, as in your photo, that little thin-walled flange was never designed as a load bearing surface. It just locates the nut and keeps it from falling through the hole. Crank down hard enough and it could break or bend.OK gotcha.
However, how can it possibly be pulled through the thick metal on the foot? The application I'm using the flange acts as a washer on one side of the lens foot, the arca plate acts as a big washer on the other side and the rivet nut simply becomes a "nut" in the middle allowing the lens foot to be sandwiched between the two washers.
I don't see how either of them could pull through that much thickness of aluminum. On a sheet steel like your example, yes, but that's not really how I was using it.
As with any improvised solution, everyone's milage may vary.
Jeff
In my photo, I stuck a rivet nut through a washer and crimped it to show how they are used. The black washer simulates a lens foot. Notice the the load bearing surface is the bulged out nut-body.
These aren't made for large structural loads. They are mostly used for mounting panels on thin guage material. Not sure if they make them long enough to work on a thick lens foot. Helicoil is better solution and many lens feet already have them. Some makers use hard-anodizing instead.
You can only see EXIF info for this image if you are logged in.
Last edited:
Mal Paso
Well-known member
So I bypassed a bunch of steps and Milled a 1/2 inch hole in a void of the foot for a Magpul MAG333-Type 1 Sling Mounting Kit, about $13 on amazon. I replaced the mill with a drill chuck and drilled a #25 hole on center and tapped it 10-24 to match the USA screws that came in the kit. I had to turn down the knurling on the base of the fitting for a fit that would allow it to turn. After cleaning everything with Chemtool I installed the fitting loosely with Loctite on the screw and filled both sides of the void with epoxy. I spun the fitting in the hole to thoroughly wet the fitting and the inside of the socket before tightening the screw. I'll pick up some black paint for the epoxy which is photosensitive.
Howzat?


Howzat?
You can only see EXIF info for this image if you are logged in.
You can only see EXIF info for this image if you are logged in.
You can only see EXIF info for this image if you are logged in.
You can only see EXIF info for this image if you are logged in.
Thats some real shade-tree engineering!
Fiat
Active member
I received the Hejnar replacement foot for my Z 600mm pf on Sat (not like the short length, but it's another topic) and waiting for a Magpul MS4 Gen2 rifle sling to arrive on Tue. I plan to set up a shoulder strap for my Z8 + Z600 pf combo. I found the Hejnar foot has two QD sockets which made me wonder if I can use both QD connectors from the sling to lock into the lens foot but before one cross point (like "X")? I don't think the "U" type of two locking points makes any sense (if lose one lock, the sling will open...). Also, I don't like the idea of hooking another safety tether to the camera body. Before receiving the Magpul sling, I am not sure it can be done with an "X" cross. Does anyone have any idea/experience?